Scrolling Characters Using the MAX7219 module.
This is the actual Scrolling Characters project that I initially developed and emulate in C#. You can find that project here and learn how I developed the core of the scrolling routines in C# to then extrapolate them to C++ for the Arduino Mega 2560.
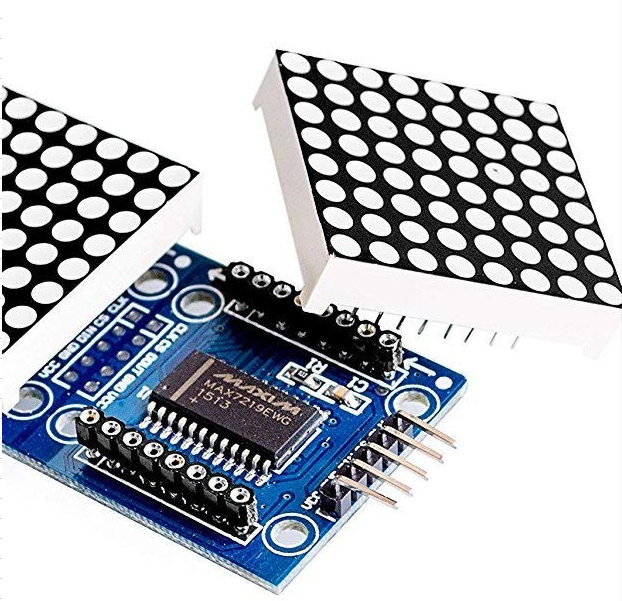
The Max7219 LED Matrix is made of an 8 x 8 array of LEDs controlled by an MAX7219 Integrated Circuit as seen in Figure 1 below.
Figure 1: The MAX7219 Integrated Circuit. You can acquire an individual module or an array of 4 modules.
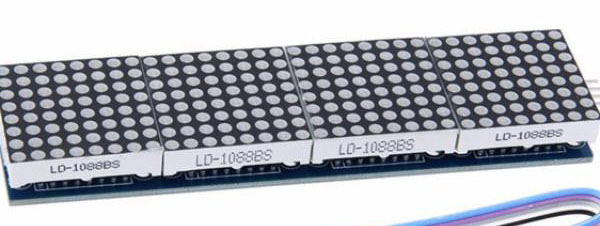
For this project I am using the SainSmart MAX7219 Dot Matrix Module 4-in-one which, as you can see in Figure 2 below, consist of four (4) individual MAX7219 assembled as one unit.
Figure 2: SainSmart MAX7219 4-in-1 Module.
On this project I will not be explaining the inner workings of the MAX7219 since there is plenty of literature in the internet, instead I will concentrate my efforts explaining how the Arduino Mega 2560 interacts with it to make characters scroll left, right, up and down. I have also developed a C# program acting as master and commander.
To handle the interactions between 2560 Mega and MAX7219 I am using the LedControl.h Library provided by Arduino. The LedControl.h takes a series of 1’s and 0’s arranged as the desired characters to accordingly power on and off the LEDs on the MAX7219 as you can see in Figure 3 below.
Figure 3: Displaying character A and its binary equivalent.
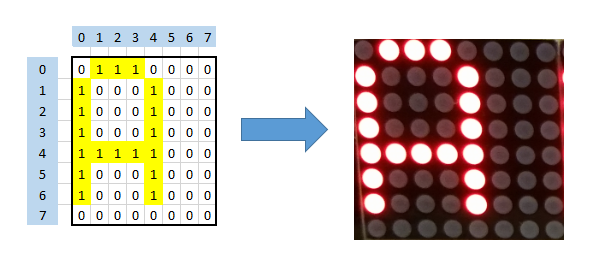
As observed above in order to display an “A” I have to send the 8 bytes to the left in an orderly timely fashion to create the visual effect of a character moving in different ways. It all depends how I choose to do the byte splash and the timing in between bytes.
So it is necessary to create a series of matrices, as the “A” above, representing the alphabet, numbers, and special characters then, by using the routines provided by LedControl.h, feed those matrices, according to a desired text, to the MAX7219 using a control program.
| Pin Name | Pin Description |
|---|---|
| DIN | Data In |
| CK | Clock |
| CS | Chip Select (Load) |
The line of code below explains what pin in the Arduino is plugged to what pin in the MAX7219:
LedControl lcRow0 = LedControl(13, 12, 11, 4);
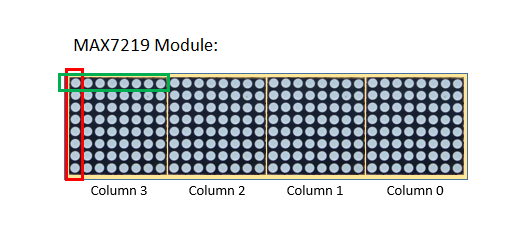
In the line above I declared pin 13 in the Arduino 2560 acting as DIN, pin 12 as CLK, and pin 11 as CS. The number 4 at the end states that I have a module with four (4) MAX7219 matrices arranged as one unit as seen in Figure 4 below:
Figure 4: MAX7219 Module outlined.
The following global variables will facilitate the handling of characters:
Global variables:
const int mTotNumOfCells = 4 //Total number of characters that can be shown at once.
int mTotNumOfRows = 1;     //Number of “1 x 4” modules.
int mTotNumOfCellsXRow = 4;     //Number of cells per module.
int mTotNumOfChars = 0;     //Total number of characters available to display
The character scrolling happens in memory to then displaying the characters in the module. In other words, what the module shows is only a reflection of what it’s in memory so as the content of memory changes so it does what the module shows.To handle that the following three variables are required:
Global variables:
int mYIndexStart = 0;   //Where to start in the array of characters.
int mYIndexEnd = 0;     //Where to end.
int mCntr4LS_RMSC = 3;  //This memory variable keeps a value for the next cell to be used
				  //as starting point as characters scroll from right to left.
Two arrays are also declared, one array holds what the user sent to the controller, and the second array is used to actually scroll the characters.
Character Arrays:
//Characters array
byte cmdByteY[64] = {0x20};            	//Up to 64 characters to be displayed.
byte cmdByteZ[mTotNumOfCells] = {0x20}; //number of chars displayed at once.
I have developed two routines to display and scroll the text, the first routine splash all characters at once to then scroll them until all characters disappear to the left. I have call this routine “Splash & Scroll.” Figure 5 below shows a graphic representation for this routine.
Figure 5: Splash & Scroll algorithm.
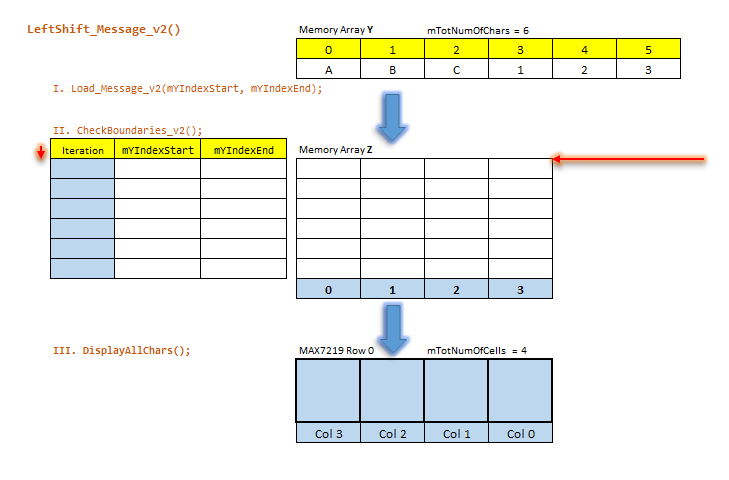
Observe how iteration 1 shows characters “ABC1” then iteration 2 shows “BC12” and so on and so forth until I reach iteration 6 where only character “3” is being displayed to then, start all over again. Then observe how the values on mIndexStart and mIndexEnd progress downwards as characters from Array Y are transferred to Array Z where the scrolling is actually happening.
See below the code for the “Splash & Scroll” algorithm and observe how a routine is called (Load_Message_v2(mYIndexStart, mYIndexEnd);) to move the next set of characters from Array Y to Array Z then, another routine is called (CheckBoundaries_v2()) to check the boundaries, and finally a call to a routine is issued to actually display of the characters (DisplayAllChars();)
'Splash & Scroll' Code
//--------------------------------------------------------------------------------------------
//Display Message in matrices of LEDs - Version 2
//--------------------------------------------------------------------------------------------
void LeftShift_Message_v2()
{
	Load_Message_v2(mYIndexStart, mYIndexEnd);
	//
	CheckBoundaries_v2();
	//
	DisplayAllChars();
}
//
//--------------------------------------------------------------------------------------------
//Load Message.
//
// This routine moves the chars from the main buffer holding the user message to the buffer
// interfaced with the Display Matrix.
//--------------------------------------------------------------------------------------------
void Load_Message_v2(int pIndexStart, int pIndexEnd)
{
	cmdByteZ[mTotNumOfCells] = { ' ' };
	for (int i = 0; i <= mTotNumOfCells - 1; i++)
	{
		if (pIndexStart <= pIndexEnd)
		{
			cmdByteZ[i] = (char)cmdByteY[pIndexStart] == ' ' ? ' ' : cmdByteY[pIndexStart];
			pIndexStart++;
		}
	}
}
//
//--------------------------------------------------------------------------------------------
//CheckBoundaries_v2 - Check Boundaries.
//This code handles how many characters will be transferred from Y to Z next time around.
//--------------------------------------------------------------------------------------------
void CheckBoundaries_v2()
{
	// If the Start Index have NOT reach the Total Number of Chars then keep going...
	if (++mYIndexStart <= mTotNumOfChars)
	{
		if (++mYIndexEnd == (mTotNumOfChars - 1)) { mYIndexEnd = mTotNumOfChars - 1; }
	}
	else //Start all over again when the Start Index have reached Total Number of Chars.
	{
		mYIndexStart = 0; mYIndexEnd = mTotNumOfCells - 1;
	}
}
It is important to remember that Arduino has a Main Loop where everything has to happen (unless Interrupts are used) so the routine above scrolls one character only and returns to the main loop where other tasks may be checked and processed. This is where Global variables become useful because of the need to preserve the memory variable values in between iterations.
The second routine starts with displaying the first character in cell 0 (zero) which is the first cell to the right then scrolling to the left. I call this method “Right Cell Start.” Check out Figure 6 below for a graphic representation of the algorithm.
Figure 6: Right Cell Start algorithm.
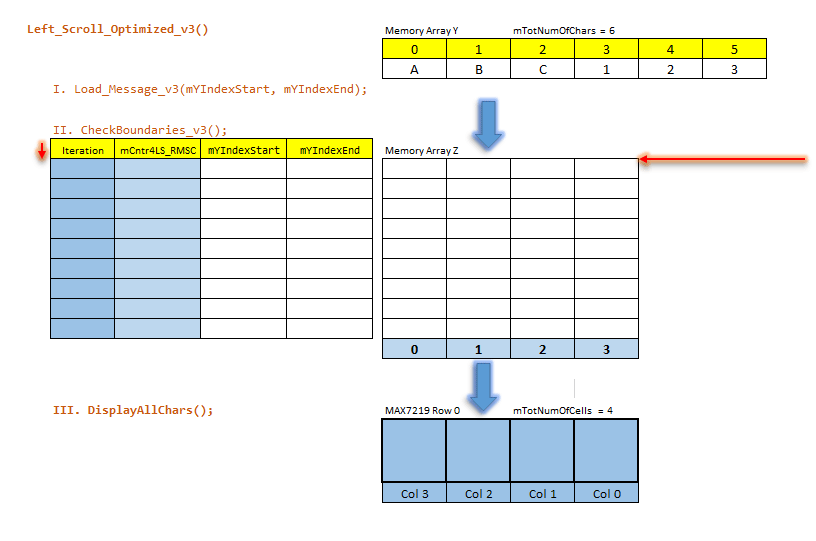
The code below shows algorithm number 2 also called “Right Cell Start.” Observe how, on its first iteration, Memory Array Z contains only the character “A”, then in iteration 2 it shows “AB” followed by “ABC”, and finally “ABC1” where the displaying slot is now full so in the next iteration it shows “BC12”and so on and so forth until the only character displayed is character “3” where it starts all over again.
'Right Cell Start' Code
//--------------------------------------------------------------------------------------------
//Display Message in matrices of LEDs - Version 2
//--------------------------------------------------------------------------------------------
void Left_Scroll_Optimized_v3()
{
	Load_Message_v3(mYIndexStart, mYIndexEnd);
	//
	CheckBoundaries_v3();
	//
	DisplayAllChars();
}
//
//--------------------------------------------------------------------------------------------
//Load Message.
// This routine moves the chars from the main buffer holding the user message to the buffer
// interfaced with the Display Matrix.
//--------------------------------------------------------------------------------------------
void Load_Message_v3(int pIndexStart, int pIndexEnd)
{
	for (int j = 0; j <= mTotNumOfCells - 1; j++) { cmdByteZ[j] = { ' ' }; }
	//
	for (int i = mCntr4LS_RMSC; i <= mTotNumOfCells - 1; i++)
	{
		if (pIndexStart <= pIndexEnd)
		{
			if ((char)cmdByteY[pIndexStart] == '^')
			{ cmdByteZ[i] = ' '; }
			else
			{ cmdByteZ[i] = cmdByteY[pIndexStart]; }
			pIndexStart++;
		}
	}
	mCntr4LS_RMSC--; if (mCntr4LS_RMSC < 0) { mCntr4LS_RMSC = 0; }
}
//
//--------------------------------------------------------------------------------------------
//CheckBoundaries_v3 - Check Boundaries.
//This code handles how many characters will be transferred from Y to Z next time around.
//--------------------------------------------------------------------------------------------
void CheckBoundaries_v3()
{
	mYIndexEnd++;
	if (mYIndexEnd >= mTotNumOfCells)
	{
		mYIndexStart++;
		if (mYIndexEnd > mTotNumOfChars - 1) { mYIndexEnd = mTotNumOfChars - 1; }
		//
		if (mYIndexStart > mTotNumOfChars) { mYIndexStart = 0; mYIndexEnd = 0; mCntr4LS_RMSC = 3; }
	}
}
The routines below do the actual splash of characters to the MAX7219 1 x 4 Module:
Display Characters Rotine:
//--------------------------------------------------------------------------------------------
//DisplayAllChars - Display Message.
//--------------------------------------------------------------------------------------------
void DisplayAllChars()
{
	int xRowx = 0; int xColx = 3;
	//
	for (int xCell = 0; xCell <= mTotNumOfCellsXRow-1; xCell++)
	{
		display_1_Char(xRowx, xColx, GetChar((String)(char)cmdByteZ[xCell]));
		//
		if (--xColx == -1) { xColx = mTotNumOfCellsXRow-1; }
	}
	//
	xDelay(mDelayTime);
}
//
//--------------------------------------------------------------------------------------------
//Displays one char
//--------------------------------------------------------------------------------------------
void display_1_Char(int mRow, int mCol, byte Char_2_Write[])
{
	if (mRow == 0){ for (int i = 0; i < 8; i++){ lcRow0.setRow(mCol, i, Char_2_Write[i]); } }
}
Below you can see a sample of what would be the GetChar() routine:
The GetChar() routine:
//--------------------------------------------------------------------------------------------
//Converts from any given char to a matriz of Bytes
//--------------------------------------------------------------------------------------------
byte* GetChar(String xC)
{
	if (xC == "3") return Char_3;
	if (xC == "2") return Char_2;
	if (xC == "1") return Char_1;
	if (xC == "0") return Char_0;
	//
	if (xC == "A") return Char_A;
	if (xC == "B") return Char_B;
	if (xC == "C") return Char_C;
	if (xC == "D") return Char_D;
	if (xC == "E") return Char_E;
	//
	if (xC == "a") return Char_a;
	if (xC == "b") return Char_b;
	if (xC == "c") return Char_c;
	if (xC == "d") return Char_d;
	if (xC == "e") return Char_e;
	//
	if (xC == "@") return Char_AT;
	if (xC == "\\") return Char_BS;
	if (xC == "^") return Char_CA;
	if (xC == "}") return Char_CB;
	if (xC == "$") return Char_DS;
	if (xC == "=") return Char_EQ;
	if (xC == ">") return Char_GT;
	if (xC == "<") return Char_LT;
	if (xC == "#") return Char_NS;
	if (xC == "{") return Char_OB;
	if (xC == "(") return Char_OP;
	if (xC == "[") return Char_OS;
	if (xC == "%") return Char_PC;
	if (xC == "+") return Char_PS;
	if (xC == "?") return Char_QM;
	if (xC == "!") return Char_EM;
	if (xC == ";") return Char_SC;
	if (xC == "*") return Char_SK;
	if (xC == "~") return Char_TI;
	if (xC == "_") return Char_UL;
	if (xC == ".") return Char_Dot;
	if (xC == " ") return Char_Sp;
	//
	return Char_Sp; //Default char
}
And finally below you can see a binary representation for a few of the ASCII characters.
Cross-reference matrix:
//1
byte Char_1[8] = {
B01000000,
B11000000,
B01000000,
B01000000,
B01000000,
B01000000,
B11100000,
B00000000};
//2
byte Char_2[8] = {
B01110000,
B10001000,
B00001000,
B00010000,
B00100000,
B01000000,
B11111000,
B00000000};
//3
byte Char_3[8] = {
B11111000,
B00010000,
B00100000,
B00010000,
B00001000,
B10001000,
B01110000,
B00000000};
//A
byte Char_A[8] = {
B01110000,
B10001000,
B10001000,
B10001000,
B11111000,
B10001000,
B10001000,
B00000000};
//B
byte Char_B[8] = {
B11110000,
B10001000,
B10001000,
B11110000,
B10001000,
B10001000,
B11110000,
B00000000};
//C
byte Char_C[8] = {
B01110000,
B10001000,
B10000000,
B10000000,
B10000000,
B10001000,
B01110000,
B00000000};
//@ - Special Character
byte Char_AT[8] = {
B01110000,
B10001000,
B00001000,
B01101000,
B10101000,
B10101000,
B01110000,
B00000000};
For the character’s binary representation, I have an external file called Chars_Matrices.h that I “#include” when the programs starts.
So folks this is pretty much it for this project. I will be creating another project where I will be demoing bitwise shift which is an interesting way to scroll characters around so stay tuned for that. Don’t forget to check out the videos and let me know your thoughts in the comments section below. As always, thanks for checking out my electronics and programming projects.
Videos
Scrolling Characters using one (1) MAX7219 - Simple version.
Scrolling Characters using four (4) MAX7219 - Automated Process.
Scrolling Characters in different ways.