Scrolling Characters Emulation System
Figure 1: Scrolling Characters Emulation System.
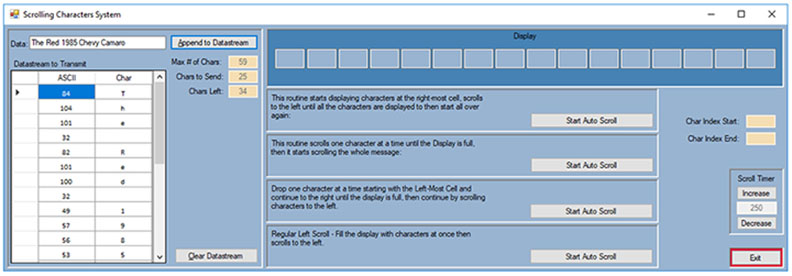
1. The Scrolling Characters System.
The idea behind this system was to develop the logic and algorithms to be used in a system controlling the MAX7219 4-Dot-Matrix Module shown in Figure 2 below.
Figure 2: The MAX7219 Module.
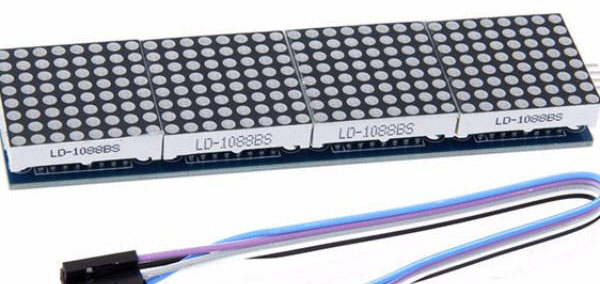
I started the MAX7219 system using an Arduino UNO R3 but quickly run out of memory which forced me to switch to an Arduino Mega 2560 R3. Languages C# and C++ are pretty similar so writing this program in C# to then extrapolate the routines to C++ is a rather simple and straightforward task. Arduino runs is C++ but writing code using its programming interface (IDE - Integreated Development Environment) may be frustrating and cumbersome specially as the program grows in size and complexity, but don't get me wrong, most of the time I use the Arudino IDE and I enjoy it, but its a love that has grown out of necessity more than anyting else. There is code that is simpler to be written or implemented in C++ than C# and vice versa and, sometimes, the way of doing things in one language will not work on the other language so the extrapolation is not always straightforward.
An important fact to keep in mind when emulating code in C# for the Arduino Mega, is that the Arduino Mega has a Main Loop and everything has to happen inside that loop which means it is not recommended to call a routine and forget to come back to the Main Loop, or go to a routine for minutes or even seconds and not go back to the Main Loop to check other stuff. That is an important design feature to remember when writing code for Arduino. sFor this example I am using a Timer to simulate the Main Loop.
2. What are we learning with this system.
As you can see in the main index above, I cannot let go of the opportunity to show off some of the coolest features provided by C# so we will be learning about Delegates and Recursion among many other features. Please also observe that sometimes, I go out of my way to implement code that it may look out of place or unnecessary, but the idea is to provide an example to a learning experience.
a. Delegates.
Delegates are a user-defined types that take a method as parameter and by instantiating the delegate the method gets executed. The only condition is that the parameter(s) and return type(s) has to be the same. Please see the code below for a Delegate example.
	namespace DelegateExample5
	{
		public partial class Form1 : Form
		{
			public delegate int PerformCalculation(int a, int b);

			public Form1() { InitializeComponent(); }

			private void Form1_Shown(object sender, EventArgs e)
			{
				Perform_Calculation();
			}

			private void Perform_Calculation()
			{
				int a = 10; int b = 4;

				PerformCalculation Calc;

				Calc = AdditionX; 	   int w = Calc(a, b); MessageBox.Show("Addition: " + w.ToString());

				Calc = SubstractionX;  int x = Calc(a, b); MessageBox.Show("Substraction: " + x.ToString());

				Calc = MultiplcationX; int y = Calc(a, b); MessageBox.Show("Multiplcation: " + y.ToString());

				Calc = DivisionX;  	   int z = Calc(a, b); MessageBox.Show("Division: " + z.ToString());
			}
			static int AdditionX(int px, int py)
			{ return px + py; }

			static int SubstractionX(int px, int py)
			{ return px - py; }

			static int MultiplcationX(int px, int py)
			{ return px * py; }

			static int DivisionX(int px, int py)
			{ return px / py; }
		}
	}
As you can see in the example above, I created the variable Calc of type PerformCalculation. Now, PerformCalculation is a delegate who takes two integers as parameters and returns an integer as result. So now I can assign a method to the Calc variable whos parameters and return are of the same type.
I have two buttons to Increase/Decrease (Figure 3) the Timer's delay. Both buttons do the same task but with opposite arithmetic sign. The Increase button increases the time by 50 milliseconds each time is clicked while the Decrease button does the opposite.
Figure 3: Increase / Decrease Delay Time buttons.
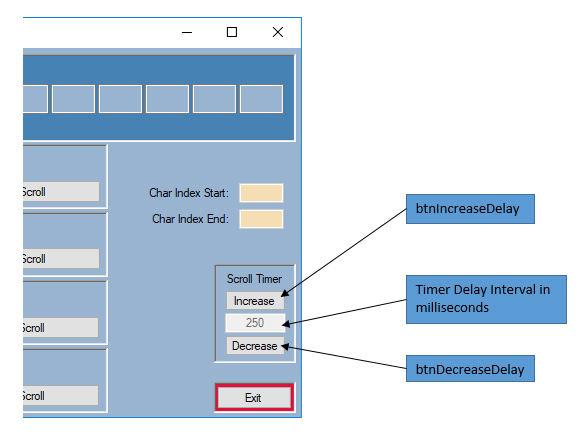
So I declared a delegate in the Form’s Load Method and attached its event to the default click event by issuing the statements shown below, so every time the user clicks one of these buttons, the OnIncDecTimerClick routine is called instead of the regular Click event (actually they both are called in sequence, click first followed by the delegate).
Code to attach the Delegate to the Click event:
//------------------------------------------------------------------------
// Routine: Form1_Load - Executed when the forms loads.
//------------------------------------------------------------------------
private void Form1_Load(object sender, EventArgs e)
{
	this.btnIncreaseDelay.Click += new EventHandler(OnIncDecTimerClick);
	this.btnDecreaseDelay.Click += new EventHandler(OnIncDecTimerClick);
}
The Routine below shows the delegate function for the Click event:
//------------------------------------------------------------------------
// Routine: OnIncDecTimerClick
//------------------------------------------------------------------------
void OnIncDecTimerClick(object sender, EventArgs e)
{
	Button xButton = sender as Button;
	if        (xButton.Text == "Increase") { IncreaseDecreaseTimerDelay(+50); }
	else { if (xButton.Text == "Decrease") { IncreaseDecreaseTimerDelay(-50); } }
}
Once I get to the delegate routine, as you can see in the code above, the need arises to know who called the delegate routine-- was it the Increase or the Decrease button? so by using the sender parameter as a reference, I instantiate it as button, thus allowing me to render all its properties which, in turn, allows me to check the ‘senders’ caption to find out what button made the call, taking the proper action accordingly.
Routine to Increase / Decrease the Timer's delay time:
//------------------------------------------------------------------------
// Routine: IncreaseDecreaseTimerDelay(int pTime)
//------------------------------------------------------------------------
private void IncreaseDecreaseTimerDelay(int pTime)
{
	int xTimerDelay = Convert.ToInt32(txtTimerDelay.Text) + pTime;
	//
	//if (xTimerDelay < 50) { xTimerDelay = 50; } else { if (xTimerDelay > 500) { xTimerDelay = 500; } }
	// Using a "?: Ternary Conditional Operator" to replace an if-else statement shown on line above.
	xTimerDelay = xTimerDelay < 50 ? 50 : xTimerDelay > 500 ? 500 : xTimerDelay;
	//
	tmrTimer1.Interval = xTimerDelay;
	txtTimerDelay.Text = xTimerDelay.ToString();
}
The same issue can be easily solved by using two routines, or by using each button’s click event calling the Increase/Decrease function with the proper parameter value, but then, we wouldn’t be able to learn delegates.
b. DataTables and DataGridViews.
I will be using ADO.NET (or ActiveX Data Object for .NET) to handle data. ADO.NET has a command called DataTable which allows to create memory representation of data in the form of rows and columns, similar to Excel. For this project, I need to have a way to store and preserve what the user types in the data textbox so ADO.NET comes in handy. I use the command below to create a Table in memory:
dtDataStream2Transmit = CreateTable();
The command above is processed in the Form’s Load Event. CreateTable() is a routine who's only job is to create a DataTable structure (see code below) and assign it to a memory variable of type DataTable.
CreateTable() routine:
//------------------------------------------------------------------------
// Routine: CreateTable
//------------------------------------------------------------------------
public DataTable CreateTable()
{
	DataTable mTable = new DataTable();
	mTable.Columns.Add("asciiData", typeof(byte));
	mTable.Columns.Add("Char", typeof(char));
	return mTable;
}
To change the scrolling message, I type the desired message in the Data TextBox, and click the Append to Datastream button (See Figure 4 below). At that time, the DataTable is cleared and the new message is appended to it and shown in the screen via the DataGridview control.
Figure 4: DataGridView and DataTable controls interacting.
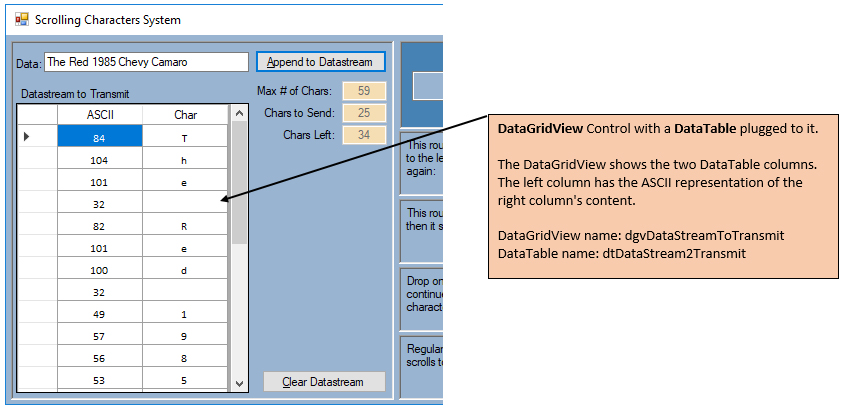
Observe the three routines below. The first one is the Click event for the Append to Datastream button. This routine calls two more routines, the first one, Convert_String2ASCII(), performs the conversion from Text to ASCII representation saving the resulting characters to the dtDataStream2Transmit DataTable, whereas the second routine, takes the DataTable information and makes a copy to a memory array called TransferStream. Remember that these routines will be running on an Arduino Mega so what appears irrelevant here may be useful under a less sophisticated system. This sounds a little cryptic so I’ll explain, Visual Studio provides an elaborate developing environment that Arduino lacks, especially when it comes to troubleshoot and debug code, so sometimes this code has to be over-simplified, compartmentalized further more, to allow easy debug and troubleshoot.
The code below shows the routines to handle user input.
//------------------------------------------------------------------------
// Routine: cmdAppend_Click
//------------------------------------------------------------------------
private void cmdAppend_Click(object sender, EventArgs e)
{
   //Populate DataTable and DataGridView by converting the typed text
   //in the TexBox to ASCII Chars.
   Convert_String2ASCII(txtData.Text);
   //
   //Pre-fix a Command to the typed text and post-fix the text with
   //Termination Characters.
   GetDataReadyToBeTransmitted();
}
//------------------------------------------------------------------------
// Routine: Convert_String2ASCII
//------------------------------------------------------------------------
private int Convert_String2ASCII(string xText)
{
  try
  {
	 dtDataStream2Transmit.Clear();
	 //
	 byte[] ASCIIValues = Encoding.ASCII.GetBytes(xText);
	 //
	 foreach (byte b in ASCIIValues)
	 { dtDataStream2Transmit.Rows.Add(b, Convert.ToChar(b)); }
	 //
	 return ASCIIValues.Count();
  }
  catch (Exception e) { Console.WriteLine(e); return -1; }
}
//------------------------------------------------------------------------
// Routine: GetDataReadyToBeTransmitted
//------------------------------------------------------------------------
private void GetDataReadyToBeTransmitted()
{
   TransferStream = new byte[64];
   //
   int i = 0;
   foreach (DataRow r in dtDataStream2Transmit.Rows)
   { TransferStream[i] = Convert.ToByte(r["asciiData"]); i++; }
   //
   mTotNumOfChars = i; //This variable holds the Total Number of characters typed by the user.
}
In the actual Scrolling System using the MAX7219 module, the Arduino Mega 2560 handles four (4) MAX7219 modules. At the same time, it gets commands plus the scrolling text from a C# program creating a constant back and forth communication between the Mega 2560 and a computer. This communication is done via a 64-character stream where the first four characters are a command, followed by the message (up to 59 characters) with a termination character at the end of the message. I am using the caret (^) as termination character.
c. Arrays.
An array is a collection of contiguous memory cells containing a series of elements of the same type. An important feature about arrays is that they have a zero-based index, meaning that the first element in the array has an index of zero, the next cell has an index of 1 and so on and so forth. See figure 5 below for an illustration of an array.
Figure 5: Array declaration and memory representation.
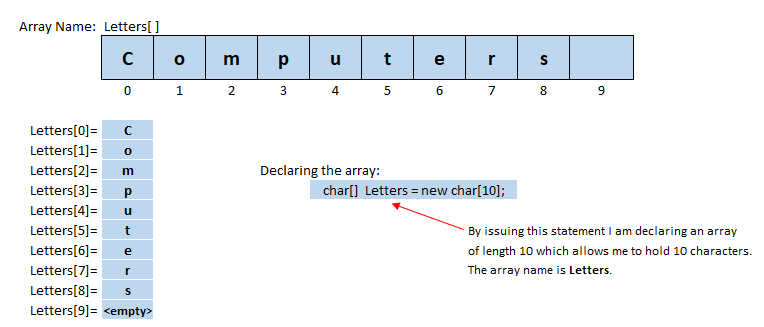
I am using two arrays to handle the character scrolling. The TransferStream array, with a length of 64 characters, has the user’s message, the second array, DisplayBuffer, with a length of 16 characters. I am using four MAX7219 modules, each with four cells, for a total of 16 cells, hence the DisplayBuffer array size.
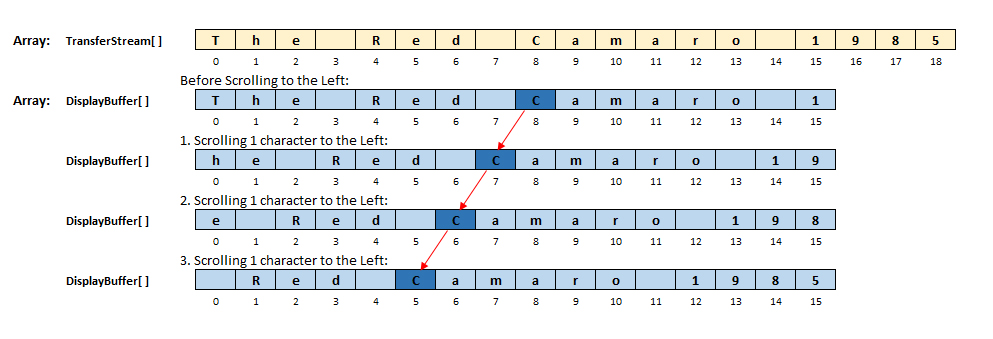
Each memory cell in the DisplayBuffer array corresponds to a physical cell in the MAX7219 module, so to scroll one character to the left, I shift the content of the DisplayBuffer array one character to the left and, as the rightmost cell empties, I borrow the next character from array TransferStream, then, I call a routine whose only purpose is to get the DisplayBuffer content and splash it to the MAX7219 modules. The scrolling is actually happening in memory, but with every splash, the scrolling visual effect is reender for the user to experience it. See figure 6 below.
Figure 6: Scrolling characters to the left.
d. Timers.
When I started writing the scrolling code for the Arduino Mega, I made the mistake of doing uninterrupted text scrolling causing the system to hang until the whole text message was scrolled out. As I have previously mentioned, Arduino has a main program where different tasks have to loop thru checking for events, user input, or any other electronic device inputs like mechanical buttons or switches. After the issue became obvious, I changed the scrolling routine to scroll one-character at a time, then go back up to the main loop to check for other stuff, including checking the Arduino communications buffer for newly arrived commands, or text messages, then going back to scroll another character and so on and so forth until the whole message was displayed thru to then, start all over again.
To implement this main loop behavior, I am using a Timer control. A Timer is a control that process an event, called Tick, every time the Timer interval runs out. The Timer interval is a number set by the programmer and expressed in milliseconds where a value of 1,000 equates to 1 second.
The code below shows how the Timer control is initialized to 250 milliseconds.
Code in the Form’s Load( ) event to initialize the Timer control.
txtTimerDelay.Text = “250”;
tmrTimer1.Interval = 250;
tmrTimer1.Enabled = false;
The code below shows the Tick() event being called after the Timer's interval runs out.
//------------------------------------------------------------------------
// Routine:
//------------------------------------------------------------------------
private void tmrTimer1_Tick(object sender, EventArgs e)
{
	tmrTimer1.Enabled = false; //Disable Timer
	//
	if (mScrollType == 1) { Load_Message_Scroll_1(); } //Scrolls to the left starting with the RMSC
	if (mScrollType == 2) { Load_Message_Scroll_2(); } //Scrolls 1 char until it fills the display
	if (mScrollType == 3) { Load_Message_Scroll_3(); } //Drop one character starting with the LMSC
	if (mScrollType == 4) { Load_Message_Scroll_4(); } //Fills out the whole display then do left scroll
	if (mScrollType == 5) { Keep_Scrolling(); }
	//
	txtChar_Index_Start.Text = mYIndexStart.ToString();
	txtChar_Index_End.Text = mYIndexEnd.ToString();
	//
	DisplayChars(ref DisplayBuffer);
	//
	tmrTimer1.Enabled = true; //Enable Timer
}
As you can see in the code above, as I get into the Tick event, I disabled the Timer to avoid ticks to happen, doing the opposite before leaving the event, then I proceed to call the selected scrolling routine based in the value stored in variable mScrollType. The scrolling routine will scroll one character and return back to the calling program to proceed with a character splash to the MAX7219 modules via the DisplayChars routine.
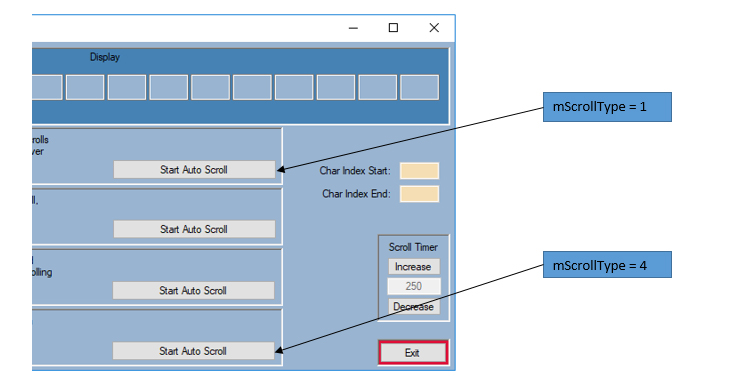
By default, the timer is off or disabled, but becomes enabled when the user clicks any of the Start Auto Scroll buttons (see Figure 7 below). At that time, the memory variable mScrollType is loaded with a value between 1 and 4. When ready to stop, click the same button to disable the timer and stop the scrolling.
When I click on any of the Start Auto Scroll buttons, I call the On_btnAutoScrollX_Click delegate event shown in the code below.
Figure 7: Auto-Scroll buttons and their relation to the mScrollType memory variable.
The code below shows the On_btnAutoScrollX_Click delegate event.
//------------------------------------------------------------------------
// Routine:
//------------------------------------------------------------------------
void On_btnAutoScrollX_Click(object sender, EventArgs e)
{
	Button xButton = sender as Button;
	//
	if (xButton.Text == "Start Auto Scroll")
	{
		int xbtnIndex = Convert.ToInt32(xButton.Name.Substring(xButton.Name.Length - 1, 1));
		//
		mScrollType = xbtnIndex;
		DisEnableSets(mScrollType);
		xButton.Text = "Stop Auto Scroll";
		//
		if (mScrollType==1){mYIndexStart = 0; mYIndexEnd = 0; mCntrl4_LMS_RMSC = 15;}
		if (mScrollType==2){mYIndexStart = 0; mYIndexEnd = 0; mCntrl4_LMS_RMSC = 15; mCntrl4_LMS_Top = 0;}
		if (mScrollType==3){mYIndexStart = -1; mYIndexEnd = -1;}
		if (mScrollType==4){mYIndexStart = 0; mYIndexEnd = 15;}
		//
		tmrTimer1.Enabled = true;
	}
	else
	{
		tmrTimer1.Enabled = false;
		xButton.Text = "Start Auto Scroll";
		DisEnableAllSets(true);
		mScrollType = 0;
	}
}
Figure 8: Graphical representation of the Auto-Scroll routines.
e. Controls Collection and Instantiation.
Controls Collection provides an easy way to access large amounts of controls with a few lines of code. Controls Collection is based on the Windows Form Object-Oriented hierarchy structure where the Form as the parent, or main control, is able to hold child controls or sub-controls. C# provides a set of statements that allow to sweep through, identify, and access those controls on a simple easy way. The code below demonstrates this feature.
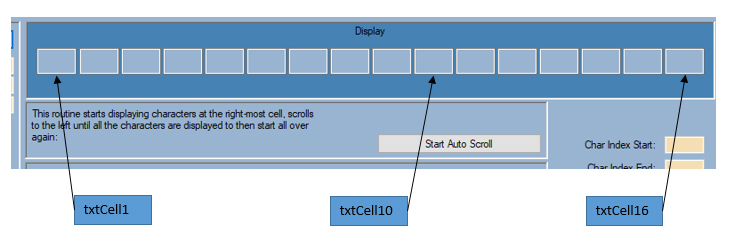
As you can see on figure 8 below, the Scrolling system has sixteen (16) cells where each cell is named txtCell1, txtCell2, all the way to txtCell16.
Figure 8: Scrolling Cells names.
Observe the routine below, and notice the commented-out code in the top of the routine. The commented-out code shows how I would have written the code without using Collections, but then, right below it you can see the few lines of code needed to replace the code above when using Controls Collection.
The code below show the use regular code versus using Controls Collection.
//------------------------------------------------------------------------
// Routine:
//------------------------------------------------------------------------
public void Clear_Cells()
{
	/* Commented-out code
	txtCell16.Text = " ";
	txtCell15.Text = " ";
	txtCell14.Text = " ";
	txtCell13.Text = " ";
	txtCell12.Text = " ";
	txtCell11.Text = " ";
	...
	txtCell6.Text = " ";
	txtCell5.Text = " ";
	txtCell4.Text = " ";
	txtCell3.Text = " ";
	txtCell2.Text = " ";
	txtCell1.Text = " ";*/
	//
	//Accessing the TextBox Controls using Controls Collections.
	foreach (Control txtBox in this.Controls)
	{
		if (txtBox is TextBox)
		{
			TextBox x = txtBox as TextBox; //instantiate x as a textbox.
			if (x.Name.Substring(0, 6) == "txtCell") { x.Text = ""; } //then check the Name property.
		}
	}
}
3. Final Comments.
The purpose of this project, as most of my projects, is to get people interested in the field of Computers in general, and Programming Languages in particular, and not necessarily to get an end product. The different routines I am creating are not merely examples but templates that can be used in a completely different project or application and it is there, I think, where the viewer could find value when reading through this webpage, as well as my other webpages. Please don’t hesitate to leave your comments below, and thanks for visiting.
Videos
Scrolling characters emulation demo