


Buidling a User Interface
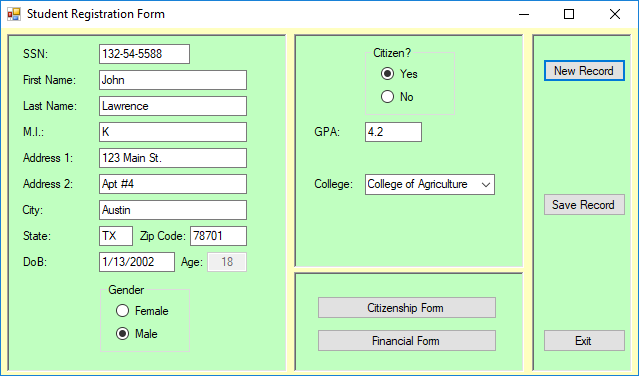
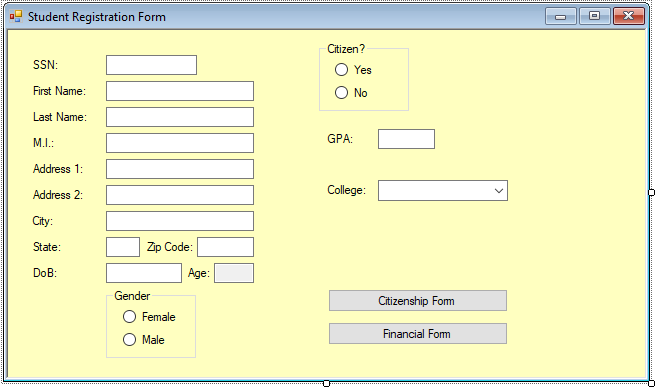
On this second part of the Class Design and Object Instantiation project, I will be creating a user form to host the previously designed data class. When designing and implementing a user interface, a form, it is important to follow the natural flow of things, just as when you read the newspaper or a magazine, from top to bottom and left to right. It also helps the user interacting with the form when the controls are grouped by relationship. In Figure 1 below, you can see how the demographics controls are grouped in one panel, a different panel holds the registration-related controls, followed by a third panel at the bottom, with two buttons calling other forms. Then, to the right, the form’s controls are grouped, including the New Record, Save Record, and Exit buttons, resulting in a clear easy-to-follow interface. Keep in mind that you are not designing software for yourself, but for other people. Thus, you should always strive for simplicity, without sacrificing functionality and reliability. In other words, you must always be one step ahead of the End-User, providing code to catch errors that may cause the application to crash.
Figure 1: Student Registration Form.
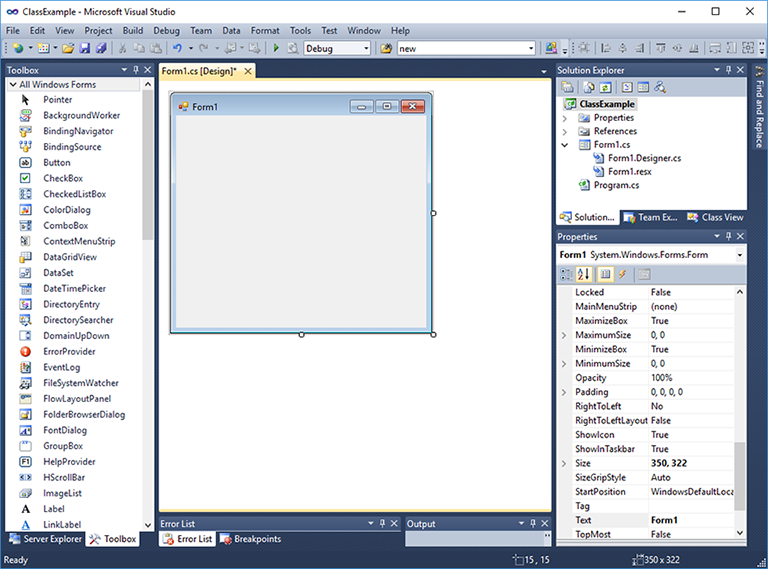
After start Visual Studio, open the project previously used to design the Student Data Class. Your form should look empty, as shown in Figure 2. Then, select the form by clicking on it and change the properties, as indicated in Table 1.
Figure 2: Project showing an empty form.
| Property Name | Property Value |
|---|---|
| BackColor | 255, 255, 192 |
| FormBorderStyle | Fixed3D |
| Size | 647, 380 |
| Text | Student Registration Form |
To the left of Visual Studio, you will find the Toolbox Pane (Figure 4), displaying a list of controls available to the programmer. All these controls are part of Visual Studio and have certain level of functionality already packed in them. Each control, when dropped into a form, exposes a series of properties, methods, and events that are accessible to the programmer via the Properties Pane, shown in Figure 3.
Figure 3: Properties Pane
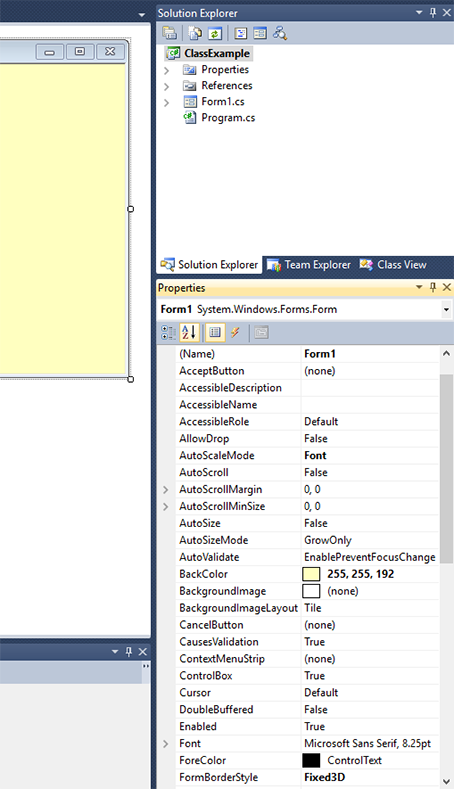
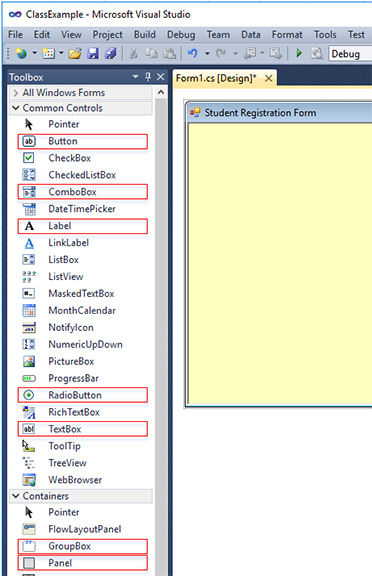
Figure 4 below shows the Toolbox Pane, where I have identified the controls I will be using on this project. I have also briefly described their functions in Table 2.
Figure 4: Visual Studio Toolbox Pane.
| Control Type | Description |
|---|---|
| Label | Displays text to give the user an idea what the control next to it should be used for. |
| TextBox | Allows user to type information. |
| ComboBox | Users are able to select one of the multiple options provided by the control. Also known as Drop-Down box. |
| Button | When clicking on it, a specific task is executed. |
| RadioButton | Two or more grouped together providing the user with mutually exclusive options. Typical use is the Gender question. |
| GroupBox | Groups RadioButton controls allows them to behave as a single control, regardless of the number of radio buttons. |
| Panel | Allows a series of controls to be neatly organized in sections. |
Visual Studio allows the programmer to create their own controls and place them in the Toolbox Pane for easy access and usage. Programmers are able to create new controls from scratch or sub-class an existing one.
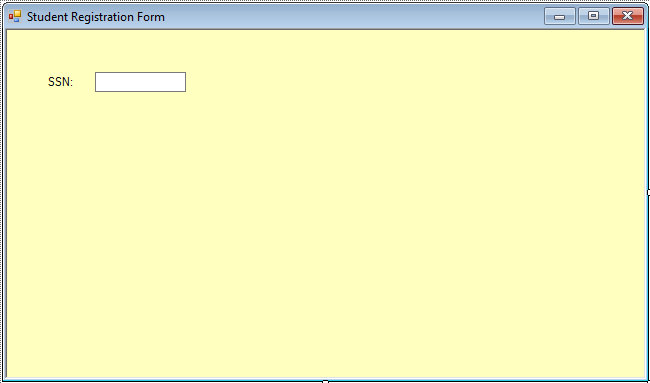
Next, proceed to drop the controls in the form and change some of the properties, as indicated in Table 3 below. There are two ways to move controls from the Toolbox Pane to the form. One is by dragging the control and ‘dropping’ it in the form. The other way is by double-clicking the control. Let’s move a Label and a TextBox Control, then drag them around so they appear as in Figure 5, then proceed to change their properties as follows:
| Type of Control | Property Name | Property Value |
|---|---|---|
| Label | Name: | lblSSN |
| Text: | SSN: | |
| TextBox | Name: | txtSSN |
| Size (width, height): | 91, 20 |
Observe how the prefixes on both controls indicate its base control as lbl for Labels and txt for Textboxes. This is an important best practices to follow when it comes to programming-- always assign a meaningful name to the control and prefix it accordingly. If I follow one best practice when building a program, it is this one because not only it does ease my work while building the program but also facilitates troubleshooting bugs and issues, or years later, to provide maintenance to an old system, or inheriting the program for someone else to maintain, let alone when working with a team of programmers, which, in that case, this practice becomes a must.
Figure 5: Form with one Label and one Textbox controls.
Using Figure 1 as a guide, drop the controls needed for demographics all the way down to DoB and Age and follow Table 4 below to assign the properties accordingly.
| Type of Control | Control Name | Text property |
|---|---|---|
| Labels | lblFirstName | First Name: |
| lblLastName | Last Name: | |
| lblMI | M.I.: | |
| lblAddress1 | Address 1: | |
| lblAddress2 | Address 2: | |
| lblCity | City: | |
| lblSt | St: | |
| lblZipCode | Zip Code: | |
| lblDoB | DoB: | |
| lblAge | Age: | |
| TextBoxes | txtFirstName | |
| txtLastName | ||
| txtMI | ||
| txtAddress1 | ||
| txtAddress2 | ||
| txtCity | ||
| txtSt | ||
| txtZipCode | ||
| txtDoB | ||
| txtAge |
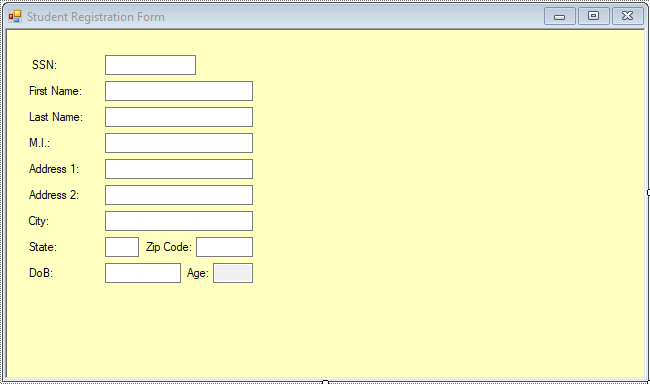
For the txtAge control, look for the ReadOnly property and make it true. We want the Age to be a calculated field and not open for the user to change its value. After completing this step, your form should look like Figure 6 below.
Figure 6: Form with demographics controls.
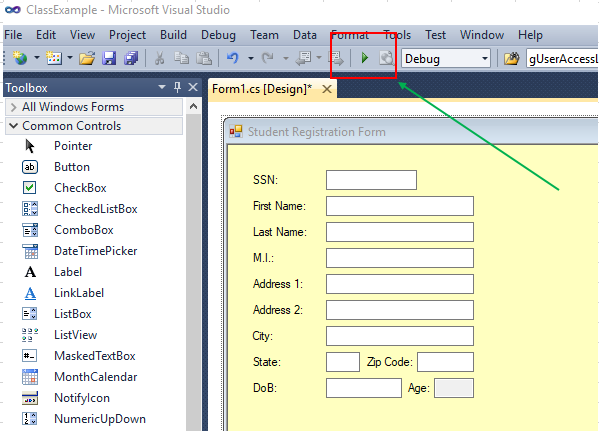
An important aspect of developing a user interface is that it should look organized and follows a natural fill-out pattern. It should be appealing to the eye, so try to make your controls the same size (height and width), and try to group them together when related, like DoB and Age. At one point, I will be adding panels to group related controls. Panels are the light green blocks shown in Figure 1 above. The point is that, as programmer, one should cultivate consistency, not only in one form, but across the whole system under development. All forms should look and feel the same to the end-user, allowing a faster learning experience. Intuition is the word we should strive for when building user interfaces. At this point, we should be able to run (execute) our form; go to Visual Studio, look for a green Play Button (Figure 7), called Start Debugging, and click on it.
Figure 7: Visual Studio Start Debugging button.
At this point, the form is running and you are able to type information and navigate across the various textboxes by cycling through them, but not much else. Close the form by clicking the X at the top right side, and let’s add some code in the background to make things a bit interesting. Right-click in the form and select View Code from the pop-up menu. Then, go all the way to the top of the code window and locate the line of code:
int gUserAccessLevel = 2;
Underneath, write the following line of code:
Student oStudent;
With the line of code above, I am declaring an object called oStudent based on my class Student. Now move to the Load event, and locate the following line of code:
Student oStudent = new Student();
and replace it with the code:
oStudent = new Student();
Underneath, add these two lines of code:
	ReadStudentRecord(oStudent);
	LoadUserControls(oStudent);
Still in the Load event, remove all the lines of code under /* Assigning values to properties */ all the way to the closing curly bracket ‘}’. What I am doing is calling on two functions. The first one, ReadStudentRecord(oStudent) reads one record worth of data from a data source. Then I am calling function LoadUserControls(oStudent) to load the controls with the data I just read. Now locate the closing curly bracket ‘}’ for the Load event and right underneath, add the following code:
private void ReadStudentRecord(Student parStudent)
{
	/* Assigning values to properties */
	parStudent.PSSN = "132-54-5588";
	parStudent.PFirstName = "John";
	parStudent.PLastName = "Lawrence";
	parStudent.PMI = "K";
	parStudent.PAddress1 = "123 Main St.";
	parStudent.PAddress2 = "Apt #4";
	parStudent.PCity = "Austin";
	parStudent.PState = "TX";
	parStudent.PZipCode = "78701";
	parStudent.PDoB = DateTime.Parse("01/13/2002 12:00:00 AM");
	//
	// oStudent.PAge - Age will be a calculated field.
	//
	parStudent.PGender = "M";
	//
	//oStudent.PGPA - GPA is now a read only property and
	// 				  only properly authenticate users will be able to update it.
	//
	parStudent.UpdateGPA(gUserAccessLevel, 4.2);
	//
	parStudent.PCitizen = true;
	parStudent.PCollege = "College of Agriculture";
	//
	parStudent.PCitizenshipFormFulfilled = false;
	parStudent.PFinancialFormFulfilled = false;
}

private void LoadUserControls(Student parStudent)
{
	txtSSN.Text = parStudent.PSSN;
	txtFirstName.Text = parStudent.PFirstName;
	txtLastName.Text = parStudent.PLastName;
	txtMI.Text = parStudent.PMI;
	txtAddress1.Text = parStudent.PAddress1;
	txtAddress2.Text = parStudent.PAddress2;
	txtCity.Text = parStudent.PCity;
	txtSt.Text = parStudent.PState;
	txtZipCode.Text = parStudent.PZipCode;
	txtDoB.Text = parStudent.PDoB.ToShortDateString();
	txtAge.Text = parStudent.PAge.ToString();
}
Observe how the function ReadStudentRecord() loads object oStudent with data. Eventually, this function will connect to an actual database (SQL/MS Access) and read a record from it, but right now, I am manually loading the data into the object. Then, function LoadUserControls loads the Textboxes, hence displaying the data for the user to see. At this point, by executing the form, data will be shown in the controls, so click the green Play button (Start Debugging) to run (execute) the form.
Observe the Age textbox showing a number. That is a reflection of the Student class at work. If you go to the Student class definition and locate the PDoB accessor, you will notice that every time I modify it, the PAge accessor is re-calculated. To make things more interesting, let’s add the following code to re-calculate the age every time the user changes the DoB. Locate the closing curly bracket for the LoadUserControls function and underneath add the following code:
private void txtDoB_Leave(object sender, EventArgs e)
{
	if (ValidateDate(txtDoB.Text) == true)
	{
		oStudent.PAge = oStudent.CalcAge(Convert.ToDateTime(txtDoB.Text));
		//
		txtAge.Text = oStudent.PAge.ToString();
	}
	else
	{
		MessageBox.Show("Invalide Date!");
		txtDoB.Text = "";
	}
}

private bool ValidateDate(string parDate)
{
	bool xRetValue = false;
	if (!string.IsNullOrEmpty(parDate))
	{
		string[] xValidFormats = { "M/d/yyyy", "M/d/yy" };
		string xCulture = "en-US";
		DateTime xValue;
		//
		xRetValue = DateTime.TryParseExact(parDate, xValidFormats, new CultureInfo(xCulture), DateTimeStyles.None, out xValue);
	}
	return xRetValue;
}
After adding the code above, the following errors pop-up so we need to fix them before continuing (see Figure 8 below):
| 1 | The call to txtDoB_Leave event. Not shown if figure below but I know it is an issue. |
| 2 | A red wavy line under CalcAge function. |
| 3 | A red wavy line under CultureInfo and DateTimeStyles functions. |
Figure 8: Wavy red lines indicating errors.
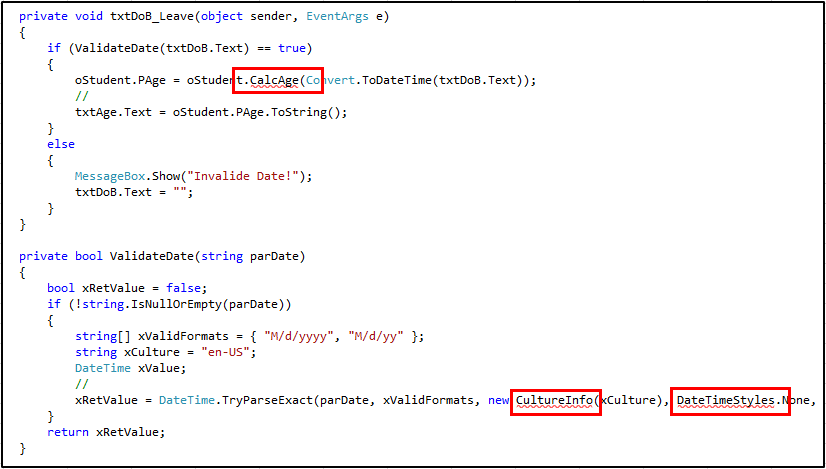
Let’s observe the code with red wavy lines. The CalcAge function has a red wavy line because, in the Student class definition, its accessor is set to private. It needs to be public since we are making a call to that function from outside the class. These words, public, private, protected, and internal, are called Access Modifiers and determine the level of accessibility to a function. So, go to the student class definition, locate the CalcAge function and change its Access Modifier from private to public and observe how the red wavy line goes away. Access Modifiers as well as Namespaces are an important part of C# and the .Net Framework, so I highly recommend getting up to speed with them. The red wavy line under CultureInfo and DateTimeStyles indicate that we are missing a reference to a .Net Framework Namespace. To take care of these two red wavy lines, go all the way to the top of the program and add the following line of code under the last ‘using’ and observe how the two red wavy lines are now gone:
using System.Globalization;
Now, let’s tackle the most complicated one, or the one that involves more steps. Observe Figure 9 below. As I have mentioned before, Visual Studio controls provide properties, events, and methods. We have visited the Properties Pane and modified some of the properties there, but now we are going to modify an event, the Leave Event for the txtDoB Textbox. When a user clicks on a Textbox, it is said that the Textbox gains focus, meaning that whatever I do with the keyboard, something will be happening in that Textbox. Also, after I am through typing and I move away from that Textbox, it loses focus. With the gain and loss of focus, many different events happen, and one of those events is called, Leave, meaning that the focus has left that particular control, thus to better understand the concept behind an event, I will reason the code before actually writing it:
"After the cursor reaches the txtDoB Textbox control (gains focus), the user will be writing a date of birth followed by hitting the Tab key (or clicking on the next control). Right at that point in time, when I am Leaving the txtDoB control, but before the next control takes focus, I want to do a few things, first I want to make sure that the date the user typed in is a valid date and not an erroneous date as in 02/30/2019. If it is NOT a valid date then I will notify the user, erase the wrong date, and either go back to the txtDoB textbox or move on to the next control. If it is a valid date, then I want to calculate the age based on today’s date and load the proper textbox control with the result."
Above you can read how my brain reasons the code behind this rather simple task, but it is pretty much the same way you will reason a complex task. Now, let’s move on to Figure 9 and follow the enumerated steps in Table 5.
Figure 9: The txtDoB_Leave Event.
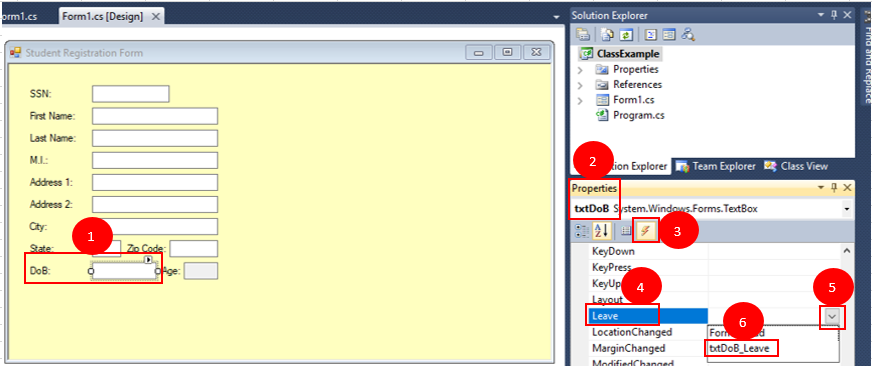
| # | Description |
|---|---|
| 1 | Selected the txtDoB Textbox by clicking on it. |
| 2 | Go to the Properties pane and observe how the txtDoB is selected and showing its properties, events, and methods. |
| 3 | Click the Lightning Bolt icon, to select the Events and Methods side of the Properties pane. |
| 4 | Scroll down (or up) until you locate the Leave Event. |
| 5 | Click the drop-down handler next to it and, since you have already added the function… |
| 6 | The txtDoB_Leave event name should appear in the drop-down list, select it. |
That is how you relate events to controls, at least one way to create that relationship. One important issue to mention is if you go back to Step 5 and remove the name, the code in the txtDoB_Leave event is erased by Visual Studio, so you have to be careful in that respect. Let’s run the form and play with the controls, especially with the DoB, which is, so far, the only control with an attached function to it. Let’s now move to the Female/Male RadioButtons. Start by locating the GoupBox Container down in the Toolbox Pane, as shown in Figure 10 below.
Figure 10: GroupBox and RadioButton controls.
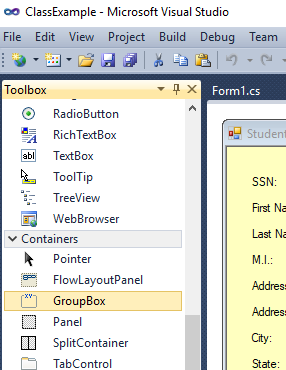
Before double-clicking the GroupBox container, click on top of the form somewhere in the yellow area just to make sure the form, and not any other control, is selected. Now double-click the GroupBox and observe how the form now handles an empty GroupBox in its upper left corner, and with a disproportionate size. Just drag the control and drop it under the DoB and Age textboxes. You may need to resize it first. Now, with the GroupBox selected, go to the Toolbox, locate the RadioButton control, and double-click on it twice, since we want two RadioButtons. Drag the controls around so RadioButton2 is right under RadioButton1 and change the following properties:
| Control | Property Name | Property Value |
|---|---|---|
| GroupBox1 | Name: | grpGender |
| Size (w x h): | 90,70 | |
| Text: | Gender | |
| RadioButton1 | Name: | rbFemale |
| Text: | Female | |
| RadioButton2 | Name: | rbMale |
| Text: | Male |
At this time, run the form and observe how the radio buttons work in tandem and are mutually exclusive. Proceed to add the Citizen? RadioButtons using the properties indicated below.
| Control | Property Name | Property Value |
|---|---|---|
| GroupBox2 | Name: | grpCitizen |
| Size (w x h): | 90,70 | |
| Text: | Citizen? | |
| RadioButton1 | Name: | rbCitizenYes |
| Text: | Yes | |
| RadioButton2 | Name: | rbCitizenNo |
| Text: | No |
Now add one Label and one Textbox control to handle the GPA, changing the properties accordingly, based on Table 8 below:
| Type of Control | Property Name | Property Value |
|---|---|---|
| Label | Name: | lblGPA |
| Text: | GPA: | |
| TextBox | Name: | txtGPA |
Add one more Label control, then locate the ComboBox control and add it to the form. Follow the Table below to change the properties accordingly:
| Type of Control | Property Name | Property Value |
|---|---|---|
| Label | Name: | lblCollege |
| Text: | College: | |
| ComboBox | Name: | cboCollege |
Now, let’s add some code to handle all these controls, including the RadioButtons. To handle the RadioButtons, locate the function, LoadUserControls, and place the cursor under the txtAge.Text = parStudent.PAge.ToString(); line of code and add the following code:
		string xGender = parStudent.PGender;
		if (xGender == "M") { rbMale.Checked = true; }
		else { if (xGender == "F") { rbFemale.Checked = true; } }
		//
		bool xCitizen = parStudent.PCitizen;
		if (xCitizen == true) { rbCitizenYes.Checked = true; }
		else { if (xCitizen == false) { rbCitizenNo.Checked = true; } }
		//
		txtGPA.Text = parStudent.PGPA.ToString();
		//
		cboCollege.Text = parStudent.PCollege;
Run the form and observe how the RadioButtons behave. Also observe how the College ComboBox is pretty much empty, with only the value I assigned to it, but no more options to select from. So, let’s populate it with a few different values. Locate the Form1_Load event and under the first opening curly bracket, add the following code:
cboCollege.Items.Add("College of Science");
cboCollege.Items.Add("College of Medicine");
cboCollege.Items.Add("College of Agriculture");
cboCollege.Items.Add("College of Business");
cboCollege.Items.Add("College of Engineering");
cboCollege.Items.Add("College of Business");
On a real system, all this information would have been loaded from a Table living inside a database, but we are not there yet, so I am doing a manual population of the ComboBox Control. After running the form, you will see that the ComboBox now shows the different options we have just added to it, and you can now switch among them. Now let’s add some buttons.
Buttons are fun because you get to click on them and call other functions and open other forms. Go to the Toolbox, locate the Button control, which is second from the top, and add two buttons to the form, then change its properties as indicated below:
| Type of Control | Property Name | Property Value |
|---|---|---|
| Button 1 | Name: | btnCitizenshipForm |
| Text: | Citizenship Form | |
| Button 2 | Name: | btnFinancialForm |
| Text: | Financial Form |
Figure 11: Form with two Button Controls.
Remember up above when I related txtDoB to its Leave Event? I will now follow a slightly different path to accomplish the same result. If you double-click on top of the btnCitizenshipForm button, Visual Studio will create a function called btnCitizenshipForm_Click, which is the Click event for that button. This means that every time the end-user clicks on this button, the code inside the btnCitizenshipForm_Click event will be processed (executed). So, double-click on top of both controls to create their Click Events. Now go to the Code window, locate the btnCitizenshipForm_Click event, and add the following line of code:
MessageBox.Show("Calling Citizenship Form!", "System Message");
Now locate the event btnFinancialForm_Click event, and add the following line of code:
MessageBox.Show("Calling Financial Form!", "System Message");
If you run the form and click on top of the buttons, you will be getting the messages shown above. At this time, I am going to constrain the program to display only messages, and leaving the calling and opening of actual forms to another project.
So, there you have it, an actual, limited, but functional form that we can use as a foundation to create many more different applications. Programming is all about abstraction, which means you reduce a complex task to simple terms by breaking that task into steps, always looking for patterns. When you identify those patterns, you realize that there is not much difference between a Student class and an Employee class or a Vendor or Provider classes. From identifying simple common patterns, we are now generalizing an idea or concept and applying it to different applications. It is similar to the vehicle example I mentioned in the beginning of this project. From a conceptual point-of-view, there is little difference between a small car and a large hauling heavy truck.
But wait, we are missing an important aspect of developing interfaces and that is to give some sort of controls to the end-user, after all, then end-user will be the person actually using the application, so let’s give her/him some control over the form by adding three more buttons and change the properties as follows:
| Type of Control | Property Name | Property Value |
|---|---|---|
| Button 1 | Name: | btnNewRecord |
| Text: | New Record | |
| Button 2 | Name: | btnSaveRecord |
| Text: | Save Record | |
| Button 3 | Name: | btnExit |
| Text: | Exit |
By clicking the Save Record button I will be saving the changes made in the Textbox controls to the database, so again, double-click the btnSaveRecord button for Visual Studio to create the Click event for the button then go to the code pane to locate the newly added Click event and add the following line of code:
MessageBox.Show("Record saved to Database!", "System Message");
Now double-click the New Record button, go to the code pane, and locate the newly created Click event and add the following code to it:
ClearUserControls();
//
gNewRecordMode = true;
//
txtSSN.Focus();
Since I am adding a new record, I need to clear all the controls off current data so I can start typing new information and to accomplish that I am calling the ClearUsercontrols() function, then, I am setting a variable to true, as in gNewRecordMode = true, indicating the Form is adding a new record. This is sort of a flag, to indicate down the road what the current condition of the form is. Before continue, go all the way to the top of the program, right under the declaration of the Student class (Student oStudent), and add the following line of code:
bool NewRecordMode = false;
With the line above, we are declaring a new variable. Every memory variable you use, regardless of its scope, must be declared and initialized. The last line of code above sets focus to the first control, txtSSN. To finish this part, add the following function right under the btnNewRecord_Click event:
private void ClearUserControls()
{
	txtSSN.Text = "";
	txtFirstName.Text = "";
	txtLastName.Text = "";
	txtMI.Text = "";
	txtAddress1.Text = "";
	txtAddress2.Text = "";
	txtCity.Text = "";
	txtSt.Text = "";
	txtZipCode.Text = "";
	txtDoB.Text = "";
	txtAge.Text = "";
	//
	rbMale.Checked = false;
	rbFemale.Checked = false;
	//
	rbCitizenYes.Checked = false;
	rbCitizenNo.Checked = false;
	//
	txtGPA.Text = "";
	//
	cboCollege.Text = "";
	//
	//parStudent.PCitizenshipFormFulfilled = false;
	//parStudent.PFinancialFormFulfilled = false;
}
Now let’s move to the btnExit button which is a little tricky. So, when I click then New Record button, I am clearing the controls to start anew with fresh information, I am also setting up variable gNewRecordMode to true indicating the form is now in New Record Mode. The reason behind this is that I want to use the Exit button to exit/cancel the New Record Mode whenever I want and as an option to the Save Record button. See, I want to have two options to exit the New Record Mode, either by clicking Save Record, which will commit the changes to the database, or by canceling the New Record Mode anytime by clicking the Exit button, but I also want to use the Exit button to exit the form all together and terminate the application whenever I want and that is where it becomes a bit complicated. Double-Click the Exit button and add the code below which takes care of the aforementioned issue:
if (gNewRecordMode == true)     	// if this memory variable is true then Form is in New Record Mode.
{                    				// which means the user wants to exit the New Record Mode.
	gNewRecordMode = false;     	// so I make the variable false
	ReadStudentRecord(oStudent);	// then, I restore data to the controls.
	LoadUserControls(oStudent);
}
else
{
	//if the form is NOT in New Record Mode, then the user wants to terminate the application.
	DialogResult xDialogResult = MessageBox.Show("Do you want to exit?", "System Message", MessageBoxButtons.YesNo);
	if (xDialogResult == DialogResult.Yes)
	{
		this.Close();
	}
	else if (xDialogResult == DialogResult.No)
	{
		//Keep going. Do not exit!
	}
}
Observe in the code above how the first thing I do is check if I am in the New Record Mode, if I am, I cancel everything and exit such mode. By exiting without saving means I am discarding whatever I have typed in the controls so a question to the user is required here before proceeding with the exit. If I am not in the New Record Mode, then I just confirm with the user if he/she really wants to exit. If the answer is No, then keep going, but if the answer is Yes, then terminate the application by issuing a Close() statement.
One final comment, I don’t really like how the txtGPA is behaving so let’s add some code to make it better. As a simple solution I will be disabling the txtGPA control if the authenticated user lacks the proper credentials to modify the GPA. So, go all the way up and locate the Form1_Load event and right before the last closing curly bracket add the following code:
if (gUserAccessLevel > 2) txtGPA.Enabled = false;
/*
if (gUserAccessLevel > 2)
{
	lblGPA.Visible = false;
	txtGPA.Visible = false;
}
*/
As you can see above, I have provided two options. The first one disables the textbox and the second (commented out) hides both the label, and textbox controls all together. Go all the way up to the top of the program and play with the gUserAccessLevel by changing its number to three (3) or larger, then back to two (2), and observe how the GPA control behave.
Thanks for visiting, and please leave your comments below. Click here to go the third and last installment of this project, connect the form to an SQL/MS Access database.
You can also click the circled numbers below.