


Plug the User Interface to a Database
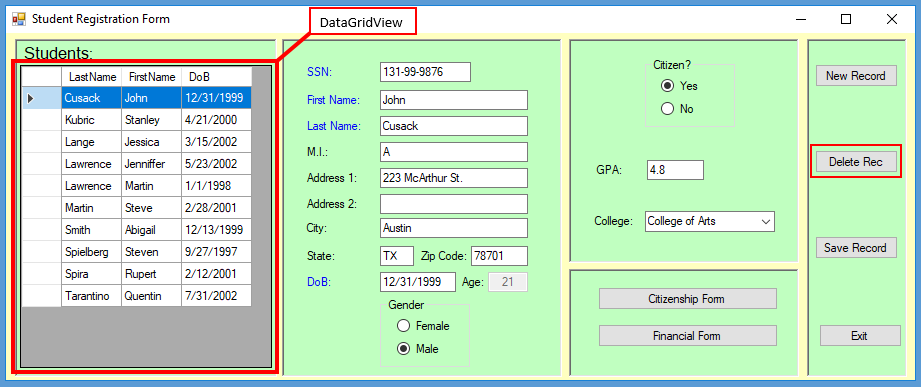
On this third part of the Class Design and Object Instantiation project I will be connecting the previously designed form to an Access/SQL Database. In this last version of the form, I have relayed on a new control which is, by itself, one of the most powerful controls in the C# arsenal, the DataGridView. DataGridViews allow easy connection to tables in memory with the purpose of browsing data in an Excel-like format, and due to is popularity and widespread knowledge, just by mentioning the word Excel, what comes to mind are rows and columns as well as sorting, searching, adding, and editing information. The graphic below (Figure 1) shows two new controls added to the form, a DataGridView to the left, and a Delete Record button to the right. I decided to add a ‘delete’ option as a way to demonstrate the code behind an option like this, but, as programmers, we must be careful when providing such an option without the proper restrictions. See Figure 1 below to get an idea of what our final product will be.
Figure 1: Students Registration Form final version.
Before anything else, I have to introduce the Access Database, the DataGridView, as well as other changes needed to get the form ready to interact with a database, then I will proceed to write the code that actually does the task of talking to the database.
1. Introducing the Access Database.
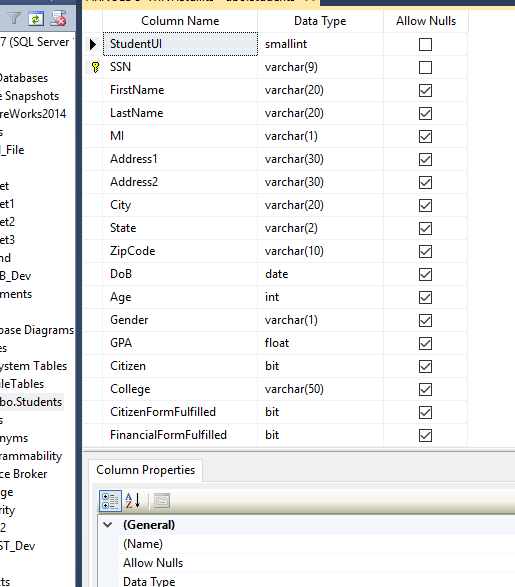
The two figures below show a graphical representation of the Microsoft Access Database Students Table in Design Mode (Figure 2) and in Browsing Mode (Figure 3) that I will be using as Back-End.
Figure 2: Students Table in Design Mode.

Figure 3: Students Table in Browsing Mode.
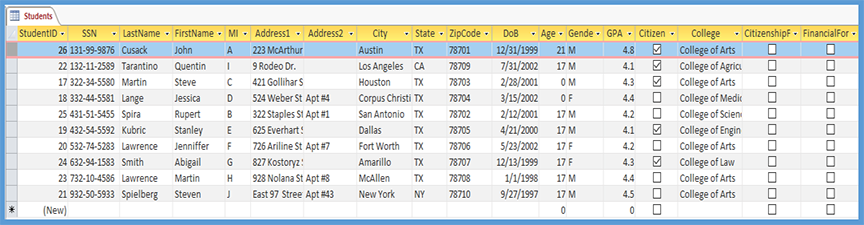
Table 1 below shows the Students table’s fields and their different value types as well as sizes.
| Field Name | Data Type | Size |
|---|---|---|
| StudentID | AutoNumber | Long Integer (Auto increment) |
| SSN | Short Text | 11 |
| LastName | Short Text | 20 |
| FirstName | Short Text | 20 |
| MI | Short Text | 1 |
| Address1 | Short Text | 30 |
| Address2 | Short Text | 30 |
| City | Short Text | 20 |
| State | Short Text | 2 |
| ZipCode | Short Text | 10 |
| DoB | DateTime | |
| Age | Integer | |
| Gender | Short Text | 1 |
| GPA | Single | |
| Citizen | Yes/No | |
| College | Short Text | 50 |
| CitizenshipFormFulfilled | Yes/No | |
| FinancialFormFulfilled | Yes/No |
You don’t have to have Microsoft Access installed in your computer to connect and interact with an Access database, but you need it to create the database and the objects inside like tables and such. Please create the Access table using the values shown in Table 1 above.
2. Enlarge the form and introduce the DataGridView.
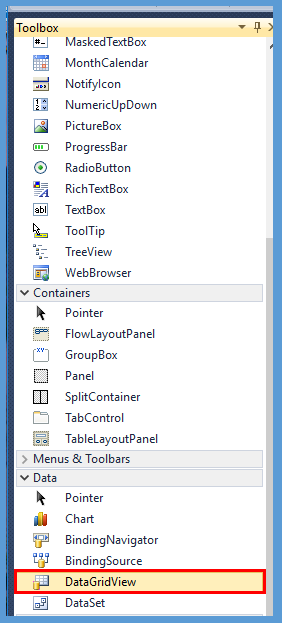
Let us now proceed to work in the form, start by increasing its size to be able to accommodate the DataGridView, so proceed to locate its Width property and change its current value to 919, you will find Width together with Height inside the Size property, then proceed to select all the controls and move them to the right allowing enough space to fit the DataGridView. Now, go to the Toolbox Pane and locate the DataGridView (see Figure 4) and drag and drop it in the form.
Figure 4. DataGridView shown in the Visual Studio Toolbox.
Change the DataGridView size to 252 x 303, then proceed to add a Label control and change its properties as indicated in Table 2. After all these changes, the form should look as Figure 5 below.
| Property Name | Property Value |
|---|---|
| Name | lblStudents |
| Text | Students: |
| Font size | 12 |
Figure 5: Students Form after dropping a DataGridView control.

We now have a DataGridView control in place so let’s change some of its properties by following Table 3 below.
| Property Name | Property Value |
|---|---|
| Name | dgvStudents |
| AllowUserToAddRows | False |
| AllowUserToDeleteRows | False |
| AllowUserToResizeColumns | False |
| AllowUserToResizeRows | False |
| Modifiers | Public |
| ReadOnly | True |
| Size | 252, 303 |
3. Introducing code to connect to the database using DataTables and DataViews.
We are now ready to introduce the changes in code needed to get the form ready to talk to the database so my first simple goal will be to plug the DataGridView to the Access Table to browse the data, and to accomplish that, I need to create a DataTable in memory, then plug the DataTable to the Access Table and for that we need ADO.NET DataSets.
ADO.NET DataSet, as defined by Microsoft .Net website, supports disconnected memory-resident representation of data, and provides a set of relational programming tools to facilitate data interaction regardless of the data source. So three things to observe here:
1. Disconnected memory-resident representation of data.
2. Relational programming tools to interact with data.
3. Regardless of the data source.
Item no 1 means that ADO.NET connects to a physical table, copies to memory a record (or set of), to then, (number 2 item) facilitate interaction with that data in memory via a set of programming tools..... (No. 3) REGARDLESS of the data source. This means that I am able to use the same set of programming tools to connect to, and interact with, different data sources such as SQL, Access, Oracle, xBase, etc.
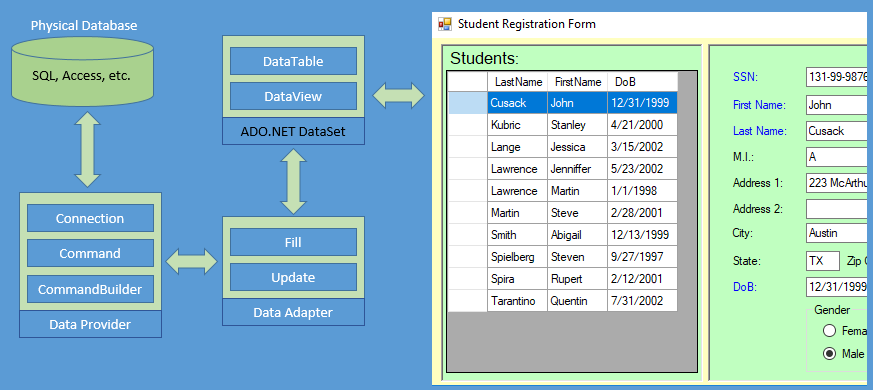
So code is coming but before that let me say that I will be creating a DataSet containing the Student Table, then I will be using a DataSet’s DataView to funnel data into the DataGridView. You can see a graphical representation in Figure 6 of what I will be accomplishing in code.
Figure 6: ADO.NET DataSet framework.
4. Plug database table to the DataGridView
So let’s go to Visual Studio Code Pane, and after going all the way to the top of the program under the ‘using’ section, add the following two lines of code:
using System.Data.SqlClient;
using System.Data.OleDb;
Then, locate the following line of code, which should be close below the ‘usings’:
bool gNewRecordMode = false;
and add the following code underneath:
//
// Table 'Students' plugged to DataGridView1.
OleDbCommand gOleDb_Command1;
OleDbDataAdapter gOleDb_DataAdapter1;
OleDbCommandBuilder gOleDb_CommandBuilder1;
//
DataSet gSQL_DataSet1;
DataTable gSQL_DataTable1;
DataView gSQL_DataView1;
//
The code above clearly shows the DataProvider section (prefix OleDb) and underneath, the DataSet section (from Figure 6 above). The DataAdapter will be built by coupling the DataProvider result with the DataSet DataTable and DataView. Now, inside Form1_Load() event locate the following line of code:
oStudent = new Student();
Underneath write the following line of code:
Load_Students_DT();
in the same Load event, remove the following two lines of code:
	ReadStudentRecord(oStudent);
	LoadUserControls(oStudent);
As a result of the code changes above, you should now have a red curly wave under the line of code Load_Students_DT, and that is because we are missing that function, so go all the way down and find the closing curly brace prior to the start of the Student Class definition and, right above that closing curly brace, insert the following code:
//*:*------------------------------------------------------------------------------*:*
//*:*- Load_Students_DT
//*:*------------------------------------------------------------------------------*:*
public void Load_Students_DT()
{
try
{
	//Connection String setup
	string MydbConnString;
	if (abcBackEnd == 1) // when 1, it talks to Access, otherwise to SQL.
	{
		MydbConnString = @"Provider=Microsoft.ACE.OLEDB.12.0;Data Source=C:\\Temp\\Students.accdb";
	}
	else
	{
		MydbConnString = "Provider = sqloledb; Data Source = " + abcSQLServer.Trim() + "; Initial Catalog = " + abcSQLDB.Trim() + "; Integrated Security = SSPI;";
	}
	//
	OleDbConnection MydbConn = new OleDbConnection(MydbConnString);
	//
	string xSQLCommand = "SELECT * FROM Students ORDER BY LastName,FirstName";
	//
	gOleDb_Command1 = new OleDbCommand(xSQLCommand, MydbConn);
	gOleDb_DataAdapter1 = new OleDbDataAdapter(gOleDb_Command1);
	gOleDb_CommandBuilder1 = new OleDbCommandBuilder(gOleDb_DataAdapter1);
	//
	gSQL_DataSet1 = new DataSet();
	gOleDb_DataAdapter1.Fill(gSQL_DataSet1, "Students");     // Fill Method Opens and Close the Connection
	//
	gSQL_DataTable1 = gSQL_DataSet1.Tables["Students"];
	gSQL_DataView1 = gSQL_DataTable1.DefaultView;
	//
	dgvStudents.DataSource = gSQL_DataSet1.Tables["Students"];
	//
	Format_DataGridview();
}
catch (SqlException e)
{
  	MessageBox.Show("An Exception was generated: " + e.ToString().Substring(0, 100) + "...");
}
}
Note: In the code above, under MydbConnString, you must point to your Access Database by using your own path. Also, notice the use of two backslash characters; the reason being is that each special character has to be ‘escaped’ using a backslash and the backslash happens to be an specials character hence the double backslash..
So the red curly wave under the line of code Load_Students_DT should have now be gone, but we got another one, under the Format_DataGridView() function, so right at the end of the Load_Students_DT function add the code below.
Applying formatting to the DataGridView:
//*:*------------------------------------------------------------------------------*:*
//*:*- Format_DataGridview
//*:*------------------------------------------------------------------------------*:*
public void Format_DataGridview()
{
	foreach (DataGridViewColumn col in dgvStudents.Columns) { col.Visible = false; }
	//
	dgvStudents.Columns[2].Visible = true;
	dgvStudents.Columns[2].Width = 60;
	dgvStudents.Columns[3].Visible = true;
	dgvStudents.Columns[3].Width = 60;
	dgvStudents.Columns[10].Visible = true;
	dgvStudents.Columns[10].Width = 70;
}
At this point, after running the form, you should be able to see the Access Student Table being browsed in the DataGridView via an ADO.NET DataSet through an OleDb DataProvider connection.
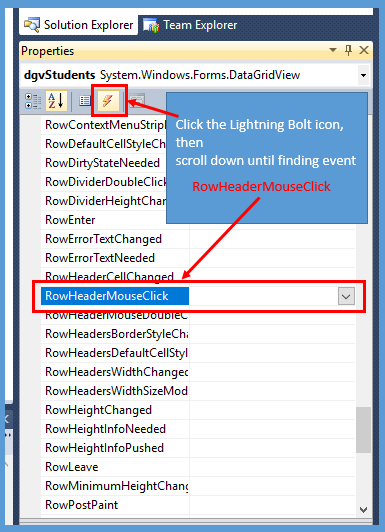
Next, what I want to do is to click a DataGridView row and make the row’s information appear in the textboxes. The DataGridView has an event called RowHeaderMouseClick which is called (...invoked...executed) every time the user clicks any of the DataGridView’s row headers so let’s proceed to add some code in that event. Go to Visual Studio Properties pane and click the Lightning Bolt to open the Methods and Events pane, then scroll down until you find the RowHeaderMouseClick event as shown in Figure 7 below.
Figure 7: DataGridView’s RowHeaderMouseClick event.
After finding and double-clicking the RowHeaderMouseClick, go to the Code Pane and locate the just created event under the name dgvStudents_RowHeaderMouseClick (the prefix dgvStudents is my DataGridView’s name). Go ahead and add the following code inside the event:
DataGridView's RowHeaderMouseClick event:
if (e.RowIndex >= 0)
{
	DataGridViewRow dr = dgvStudents.SelectedRows[0];
	txtStudentID.Text = dr.Cells[0].Value.ToString();
	//
	ReadStudentRecord(oStudent,dr);
	//
	LoadUserControls(oStudent);
}
After adding the code above, I am getting two red wavy lines, one under the txtStudentID and the second one under the ReadStudentRecord function. To fix the first one, proceed to add one Textbox and change its properties according to the table below. This new textbox will be holding the StudentID field. If it is not already selected, click in the new textbox and change the following properties:
| Property Name | Property Value |
|---|---|
| Name: | txtStudentID |
| ReadOnly: | True |
| TextAlign: | Center |
| Visible: | False |
Since the txtSudentID will be hidden its position is irrelevant but to keep everything organized let’s place it next to the txtSSN textbox. Now to fix the second red wavy line, locate your ReadStudentRecord function and completely replace it with the one below:
ReadStudentRecord() function:
//*:*----------------------------------------------------------------------*:*
//*:*- ReadStudentRecord
//*:*----------------------------------------------------------------------*:*
private void ReadStudentRecord(Student parStudent, DataGridViewRow parDR)
{
	// Assigning values to properties
	parStudent.PSSN = parDR.Cells[1].Value.ToString();
	parStudent.PFirstName = parDR.Cells[3].Value.ToString();
	parStudent.PLastName = parDR.Cells[2].Value.ToString();
	parStudent.PMI = parDR.Cells[4].Value.ToString();
	parStudent.PAddress1 = parDR.Cells[5].Value.ToString();
	parStudent.PAddress2 = parDR.Cells[6].Value.ToString();
	parStudent.PCity = parDR.Cells[7].Value.ToString();
	parStudent.PState = parDR.Cells[8].Value.ToString();
	parStudent.PZipCode = parDR.Cells[9].Value.ToString();
	//
	//When PDoB is loaded, PAge is calculated (by Class definition)
	parStudent.PDoB = Convert.ToDateTime(parDR.Cells[10].Value);
	parStudent.PAge = parStudent.PAge;
	//
	parStudent.PGender = parDR.Cells[12].Value.ToString();
	//
	//oStudent.PGPA - GPA is now a read only property and
	//only authenticate users will be able to update it.
	parStudent.UpdateGPA(gUserAccessLevel, Convert.ToDouble(parDR.Cells[13].Value));
	//
	parStudent.PCitizen = Convert.ToBoolean(parDR.Cells[14].Value);
	//
	parStudent.PCollege = parDR.Cells[15].Value.ToString();
	//
	parStudent.PCitizenshipFormFulfilled = Convert.ToBoolean(parDR.Cells[16].Value);
	parStudent.PFinancialFormFulfilled = Convert.ToBoolean(parDR.Cells[17].Value);
}
Now locate the btnExit_Click event and comment-out the following two lines of code:
	//ReadStudentRecord(oStudent);
	//LoadUserControls(oStudent);
Next locate the btnSaveRecord_Click event and do the same as above.
	//ReadStudentRecord(oStudent);
	//LoadUserControls(oStudent);
Finally, locate your LoadUserControls function and make sure it looks exactly like the code below:
ReadStudentRecord() function:
//*:*----------------------------------------------------------------------*:*
//*:*- LoadUserControls
//*:*----------------------------------------------------------------------*:*
private void LoadUserControls(Student parStudent)
{
	txtSSN.Text = parStudent.PSSN;
	txtFirstName.Text = parStudent.PFirstName;
	txtLastName.Text = parStudent.PLastName;
	txtMI.Text = parStudent.PMI;
	txtAddress1.Text = parStudent.PAddress1;
	txtAddress2.Text = parStudent.PAddress2;
	txtCity.Text = parStudent.PCity;
	txtSt.Text = parStudent.PState;
	txtZipCode.Text = parStudent.PZipCode;
	txtDoB.Text = parStudent.PDoB.ToShortDateString();
	txtAge.Text = parStudent.PAge.ToString();
	//
	//
	string xGender = parStudent.PGender;
	if (xGender == "M") { rbMale.Checked = true; }
	else { if (xGender == "F") { rbFemale.Checked = true; } }
	//
	bool xCitizen = parStudent.PCitizen;
	if (xCitizen == true) { rbCitizenYes.Checked = true; }
	else { if (xCitizen == false) { rbCitizenNo.Checked = true; } }
	//
	txtGPA.Text = parStudent.PGPA.ToString();
	//
	cboCollege.Text = parStudent.PCollege;
}
Observe, in the animated figure below, how the clicking of the DataGridView row header evolves into calling the RowHeaderMouseClick event, which in turn, calls two other functions. Proceed to click the green Play button and once the form is up and running, click on each of the rows and observe how the textboxes are populated with information coming from the DataTable.
Figure 8: Calling the RowHeaderMouseClick event.

Once the form finish loading, I want the first DataGridView row selected and the textboxes populated. Then using the arrow keys, scroll up and down through the DataGridView while having information shown in the controls. To accomplish that I need to activate an event in the DataGridView called SelectionChanged. So click the DataGridView, then go to the Properties Pane, click the Lightning Bolt, and scroll down until you reach the SelectionChanged event and double-click on it. Then go to the Code Pane, locate the method just added (should be called dgvStudents_SelectionChanged) and add the code below:
if (dgvStudents.SelectedRows.Count >= 1)
{
	DataGridViewRow dr = dgvStudents.SelectedRows[0];
	txtStudentID.Text = dr.Cells[0].Value.ToString();
	//
	ReadStudentRecord(oStudent, dr);
	//
	LoadUserControls(oStudent);
}
Now go all the way up to the Form’s Load event and add the following line of code:
//this LoC selects the first row in the dgv thus loading the controls with data.
if (dgvStudents.RowCount > 0) dgvStudents.Rows[0].Selected = true;
So now, observe how, after running the form, the first row gets selected and its content appears in the textboxes; also observe how, by scrolling up and down using the arrow keys, each row gets displayed in the textboxes.
After adding the code above, I am able to navigate through the Table records displaying their content in the textboxes, but now I want to modify any of the fields content and save the changes to the Database table so I will now add code to the 'Save Record' button click event. Go the Code Pane and locate the btnSaveRecord_Click event and replace whatever code is in there with the following code:
	  oStudent.PSSN = txtSSN.Text;
	  oStudent.PFirstName = txtFirstName.Text;
	  oStudent.PLastName = txtLastName.Text;
	  oStudent.PMI = txtMI.Text;
	  oStudent.PAddress1 = txtAddress1.Text;
	  oStudent.PAddress2 = txtAddress2.Text;
	  oStudent.PCity = txtCity.Text;
	  oStudent.PState = txtSt.Text;
	  oStudent.PZipCode = txtZipCode.Text;
	  oStudent.PDoB = Convert.ToDateTime(txtDoB.Text);
	  oStudent.PAge = Convert.ToInt32(txtAge.Text);
	  oStudent.UpdateGPA(gUserAccessLevel, Convert.ToDouble(txtGPA.Text));
	  oStudent.PCollege = cboCollege.Text;
	  oStudent.PGender = rbMale.Checked == true ? "M" : "F";
	  oStudent.PCitizen = rbCitizenYes.Checked == true ? true : false;
	  //
	  if (gNewRecordMode == true)
	  {
		  AddNewRecordOleDB(oStudent);
		  //
		  //If I am in the "New Record Mode", then exit "New Record Mode" after saving
		  gNewRecordMode = false;
	  }
	  else
	  {
		  SaveEditedRecordOleDB(oStudent);
	  }
	  //
	  Load_Students_DT();
	  //
	  dgvStudents.DataSource = gSQL_DataTable1;
	  //
	  MessageBox.Show("Record saved to Database!", "System Message");
After adding the code above, two red wavy lines appear under the functions AddNewRecordOleDB and SaveEditedRecordOleDB. As you can see in the code above, I am using the memory variable gNewRecordMode to determine if the saving event refers to a new or an edited record. You may remember how the gNewRecordMode variable is set to True when the user clicks the ‘New Record’ button taking the Form into a ‘New Record Mode’ otherwise the Form is in ‘Edit Record Mode’. To take care of this issue, go to the closing curly bracket for the btnSaveRecord_Click event, and add the following code:
  //*:*-------------------------------------------------------------------------------------------------*:*
  //*:*- AddNewRecordOleDB
  //*:*-------------------------------------------------------------------------------------------------*:*
  public void AddNewRecordOleDB(Student parStudent)
  {
	  String xSSN = parStudent.PSSN;
	  String xFirstName = parStudent.PFirstName;
	  String xLastName = parStudent.PLastName;
	  String xMI = parStudent.PMI;
	  String xAddress1 = parStudent.PAddress1;
	  String xAddress2 = parStudent.PAddress2;
	  String xCity = parStudent.PCity;
	  String xState = parStudent.PState;
	  String xZipCode = parStudent.PZipCode;
	  String xCollege = parStudent.PCollege;
	  String xGender = parStudent.PGender;

	  DateTime xDoB = parStudent.PDoB;
	  int xAge = parStudent.PAge;
	  double xGPA = parStudent.PGPA;

	  bool xCitizen = parStudent.PCitizen; //(parStudent.PCitizen == true ? "Yes" : "No");
	  //
	  //Setup Connection String - This varies according to the BackEnd being used
	  string MydbConnString;
	  if (abcBackEnd == 1)
	  {
		  MydbConnString = @"Provider=Microsoft.ACE.OLEDB.12.0;Data Source=C:\\Temp\\Students.accdb";
	  }
	  else
	  {
		  MydbConnString = "Provider = sqloledb; Data Source = " + abcSQLServer.Trim() + "; Initial Catalog = " + abcSQLDB.Trim() + "; Integrated Security = SSPI;";
	  }
	  //
	  OleDbConnection MydbConn = new OleDbConnection(MydbConnString);
	  OleDbCommand MydbCmd = new OleDbCommand(
	  "INSERT INTO Students " +
	  "(SSN, FirstName, LastName, MI, Address1, Address2, City, State, ZipCode, Gender, College, DoB, Age, GPA, Citizen) " +
	  "VALUES " +
	  "(" + " " +
		  "'" + xSSN + "'," +
		  "'" + xFirstName + "'," +
		  "'" + xLastName + "'," +
		  "'" + xMI + "'," +
		  "'" + xAddress1 + "'," +
		  "'" + xAddress2 + "'," +
		  "'" + xCity + "'," +
		  "'" + xState + "'," +
		  "'" + xZipCode + "'," +
		  "'" + xGender + "'," +
		  "'" + xCollege + "'," +
		  "'" + xDoB.ToShortDateString() + "'," +
		  "'" + xAge.ToString() + "'," +
		  "'" + xGPA.ToString() + "'," +
		  "'" + Convert.ToInt32(xCitizen) + "'" +
		  ")");
	   //
	  MydbCmd.Connection = MydbConn;
	  //
	  MydbConn.Open();
	  MydbCmd.ExecuteNonQuery();
	  MydbConn.Close();
  }
  //*:*-------------------------------------------------------------------------------------------------*:*
  //*:*- SaveNewRecordOleDB
  //*:*-------------------------------------------------------------------------------------------------*:*
  public void SaveEditedRecordOleDB(Student parStudent)
  {
	  int xStudentID = Convert.ToInt32(txtStudentID.Text);
	  //
	  String xSSN = parStudent.PSSN;
	  String xFirstName = parStudent.PFirstName;
	  String xLastName = parStudent.PLastName;
	  String xMI = parStudent.PMI;
	  String xAddress1 = parStudent.PAddress1;
	  String xAddress2 = parStudent.PAddress2;
	  String xCity = parStudent.PCity;
	  String xState = parStudent.PState;
	  String xZipCode = parStudent.PZipCode;
	  String xCollege = parStudent.PCollege;
	  String xGender = parStudent.PGender;

	  DateTime xDoB = parStudent.PDoB;
	  int xAge = parStudent.PAge;
	  double xGPA = parStudent.PGPA;

	  bool xCitizen = parStudent.PCitizen; //(parStudent.PCitizen == true ? "Yes" : "No");
	  //
	  //Setup Connection String - This varies according to the BackEnd being used
	  string MydbConnString;
	  if (abcBackEnd == 1)
	  {
		  MydbConnString = @"Provider=Microsoft.ACE.OLEDB.12.0;Data Source=C:\\Temp\\Students.accdb";
	  }
	  else
	  {
		  MydbConnString = "Provider = sqloledb; Data Source = " + abcSQLServer.Trim() + "; Initial Catalog = " + abcSQLDB.Trim() + "; Integrated Security = SSPI;";
	  }
	  //
	  OleDbConnection MydbConn = new OleDbConnection(MydbConnString);
	  //
	  OleDbCommand MydbCmd = new OleDbCommand(
	  "UPDATE Students SET " +
	  " SSN = '" + xSSN + "', " +
	  " FirstName = '" + xFirstName + "', " +
	  " LastName = '" + xLastName + "', " +
	  " MI = '" + xMI + "', " +
	  " Address1 = '" + xAddress1 + "', " +
	  " Address2 = '" + xAddress2 + "', " +
	  " City = '" + xCity + "', " +
	  " State = '" + xState + "', " +
	  " ZipCode = '" + xZipCode + "', " +
	  " Gender = '" + xGender + "', " +
	  " DoB = '" + xDoB.ToShortDateString() + "', " +
	  " Age = '" + xAge.ToString() + "', " +
	  " GPA = '" + xGPA.ToString() + "', " +
	  " Citizen = " + Convert.ToInt32(xCitizen) + ", " +
	  " College = '" + xCollege + "' " +
	  " WHERE  (StudentID = " + xStudentID.ToString() + ");");
	  //
	  MydbCmd.Connection = MydbConn;
	  //
	  MydbConn.Open();
	  MydbCmd.ExecuteNonQuery();
	  MydbConn.Close();
  }
Note: In the code above, under MydbConnString, you must point to your Access Database by using your own path. Also, notice the use of two backslash characters; the reason being is that each special character has to be ‘escaped’ using a backslash and the backslash happens to be an specials character hence the double backslash..
Proceed to run the Form, change the data in some of the textboxes and click the Save Record button. Observe how, when changing the Last Name, the DataGridView re-sorts the records accordingly. Also observe how the ‘saving code’ is doing ‘round trips’ to the Database. It saves the changes to the Table, then reloads the Table in memory, to finally refresh the DataGridView with the just committed changes. This is an important aspect to consider, or keep in mind, when writing code interacting with Multi-user databases so just be conscious of this type of issues or challenges. In other words, you don’t want to unwittingly overwrite data changes done by other users.
Let’s now add code to the New Record button, so go the Form Design Pane and double-click that button, then go back to the Code Pane, and locate the newly created event called btnNewRecord_Click and add the following code inside that event:
	  ClearUserControls();
	  //
	  gNewRecordMode = true;
	  //
	  txtSSN.Focus();
Add the function below, which is the ClearUserControls function:
private void ClearUserControls()
{
	txtSSN.Text = "";
	txtFirstName.Text = "";
	txtLastName.Text = "";
	txtMI.Text = "";
	txtAddress1.Text = "";
	txtAddress2.Text = "";
	txtCity.Text = "";
	txtSt.Text = "";
	txtZipCode.Text = "";
	txtDoB.Text = "";
	txtAge.Text = "";
	//
	rbMale.Checked = false;
	rbFemale.Checked = false;
	//
	rbCitizenYes.Checked = false;
	rbCitizenNo.Checked = false;
	//
	txtGPA.Text = "";
	//
	cboCollege.Text = "";
	//
	//parStudent.PCitizenshipFormFulfilled = false;
	//parStudent.PFinancialFormFulfilled = false;
}
Now locate the btnExit_Click event and replace all code in there with the code below:
// if this memory variable is true then Form is in New Record Mode.
if (gNewRecordMode == true)
{
	gNewRecordMode = false;
	//ReadStudentRecord(oStudent);
	//LoadUserControls(oStudent);
}
else
{
	DialogResult xDialogResult = MessageBox.Show("Do you want to exit?", "System Message", MessageBoxButtons.YesNo);
	if (xDialogResult == DialogResult.Yes)
	{
			this.Close();
	}
	else if (xDialogResult == DialogResult.No)
	{
		//Keep going. Do not exit!
	}
}
This last piece of code takes care of the logic involving the Exit Button and the New Record Mode as we have previously talked about.
Observe how when clicking the New Record button, all the textbox controls are emptied as part of getting the form ready to capture information for a brand new record. This time, after filling out some of the textboxes, proceed to click the Save Record button, and observe how the AddNewRecordOleDB function will be called, inserting a new record in the Database table accordingly. At this time, because we are lacking data validation pretty much at all levels, you will have to populate all the fields to avoid crashing the form after clicking the Save Record button.
As you can see throughout the different routines, I have built the code to talk to Access or an SQL Server based on a single variable called abcBackEnd. When abcBackEnd is equal to 1, the routines talk to Access otherwise they talk to an SQL Server. Two more variables are needed when interacting with an SQL server, the Server and Database names, abcSQLServer and abcSQLDB. These three variables must be declared and initialized at the properties level right at the beginning of the program
Figure 9: Students Table hosted on an SQL Server.
I hope you find this project useful. Thanks for visiting and please leave your comments below.