


C# Programming
C# (pronounced C-Sharp) is a fully Object-Oriented Programming language and as such, it allows encapsulation, inheritance, and polymorphism, the three paradigms that define an Object-Oriented Language. Encapsulation defines the process in which the properties, methods, and events are bundled together and hidden inside an object (base class). Inheritance allows the use of these hidden properties, events, and methods to create new objects. It is also known as sub-classing or inheriting from a base class. Polymorphism then permits one or more objects to create, not only a new object, but a morphed one, which inherits some of the base functionalities, while adding new features.
Just as a vehicle, which has four doors, four tires, an engine, a wheel, and so forth, the base class that defines any regular car also defines thousands of many other types of cars because they all share some same basic features and functions. Now, if we take that base class and tweak it a bit, we can create a car with two doors, rather than four, but with all the other features. We can make major changes to the base class and come up with a pick-up truck. That is what Object-Oriented Programming (OOP) is all about.
Create objects and reuse them with little effort is one of my favorite features in C#. In addition, there is the ability to implement ‘Delegates’, ‘Generics’, and ‘Serialization’ plus many more nice and cool features. However, let’s start by creating a base class to then make (instantiate) an object based on that class. The word ‘instantiate’ or ‘instance of a class’ is just a fancy way to say "copy of a class”.
Class Definition and Object Instantiation
For this example, I will be creating a simple class based on a student record containing basic information. I will define a class, a Student Class, and then create an object based on that class, or rather, create an object that is an instance of the Student Class . Therefore, as part of the class-creation process, I will define the properties, events, and methods inside the class, or, to use OOP jargon, I will be encapsulating all this information inside the class. Students share some common information, such as, social security number (SSN), name, address, date of birth (DoB), age, gender, grade point average (GPA), citizen or international student, college attending, financial information, and many more, but for the purposes of this example, I will use only these few fields.
SSN, Name, and address are properties that hold a series of alphanumeric characters, DoB is a property that holds dates, whereas age is a property that should be able to hold only numbers (age could also be a calculated field, meaning the software will calculate the age based on the DoB). With gender, we have a property with two possible answers, female or male (F or M). GPA is a numeric non-integer property so it should be able to hold decimal numbers.
The three remaining properties need some special treatment as the answers provided could trigger the need for more properties to be populated. The question related to citizenship can be expressed in a way that the answer requires a simple yes or no, or a Boolean answer. A Boolean data type has only two possible values, true or false (or yes and no). Thus, if the question is phrased as Citizen (Y/N)? and the answer is no, then we may need to collect more information regarding the student's legal status, which will trigger calling another form with more questions to be populated, or perhaps a flag will be set on, indicating that the student’s legal status form has to be properly populated and the flag will not go off until that prerequisite is fulfilled.
The property or question related to ‘college attending,’ while it’s a question with many possible answers, it is limited to a particular University as in College of Business, College of Engineering, College of Agriculture, and so forth. The possible answers are well-defined, making this property a perfect fit for a Drop-Down Control (or a List Control) with the possible (limited number) answers already populated in the control and ready to be picked up with a click of a mouse. The issue here is that based on the response, we may need to ask more questions regarding the student’s background, such as transcripts, GMAT score, TOFEL for non-native English speakers, and others. The last property on the class, Financial Information, may be linked to the answer provided in the citizenship property, thus, it will trigger an additional form with more properties or questions to be answered.
Above are the different data types definitions to be used by each of the properties. Data Types are an important part of any computer language so I recommend becoming well-versed with them. Table 1 below shows a summary of the properties defined above and their data types:
| Description | Property Name | Data Type | Length | Type of Control |
|---|---|---|---|---|
| SSN | pSSN | String | 9 | Text Box |
| Last Name | pLastName | String | 20 | Text Box |
| First Name | pFirstName | String | 20 | Text Box |
| Middle Initial | pMI | String | 5 | Text Box |
| Address 1 | pAddress1 | String | 30 | Text Box |
| Address 2 | pAddress2 | String | 30 | Text Box |
| City | pCity | String | 20 | Text Box |
| State | pState | String | 2 | Text Box |
| Zip Code | pZipCode | String | 10 | Text Box |
| Date of Birth | pDoB | Date | Text Box | |
| Age | pAge | Integer | Text Box | |
| Gender | pGender | String | 1 | Radio Buttons |
| GPA | pGPA | Double | Text Box | |
| Citizen (Y/N)? | pCollege | Boolean | Radio Buttons | |
| College Attending: | pCitizen | String | 30 | Drop Down (or List) |
| Hidden Properties: | ||||
| Citizenship Form fulfilled | pCitizenshipFormFulfilled | Boolean | <no control> | |
| Financial Form fullfilled | pFinancialFormFullfilled | Boolean | <no control> |
Observe, at the table above, how I have prefixed the Property Name with a “p.”. That is sort of a rule I have created so whenever I go through the code and I see a memory variable with a “p” prefix, I will know, at a glance, that it refers to a property and not to a regular variable. As a programmer, you must develop your own conventions to facilitate how you write and troubleshoot your code. Moreover, in the last three columns, notice how I have declared the type and size for each property, and finally, I have declared the type of control I will be using to host the different properties at the time of user interaction.
At this time, I will be working only on the data class design. However, eventually I will be developing an interface (or a form) to host the data class and to interface with the user. The third phase of this project will be to connect the interface to an SQL/MS Access database.
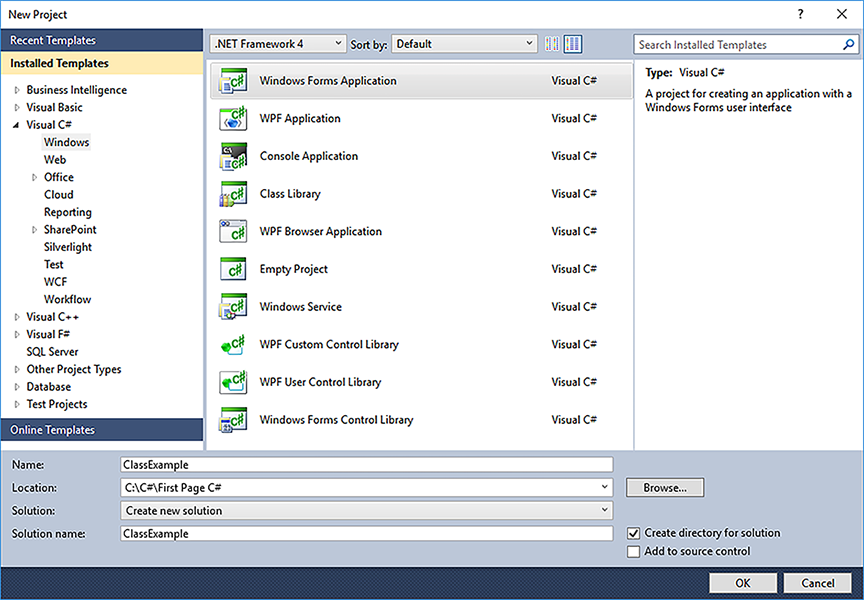
After defining the data class, let’s now focus on writing some code so fire up Microsoft Visual Studio and create a new project by clicking File, then select New Project. You will get the form below. There, select a folder for your project and name your project, ClassExample, and click OK. See Figure 1 below.
Figure 1: Visual Studio Create New Project.
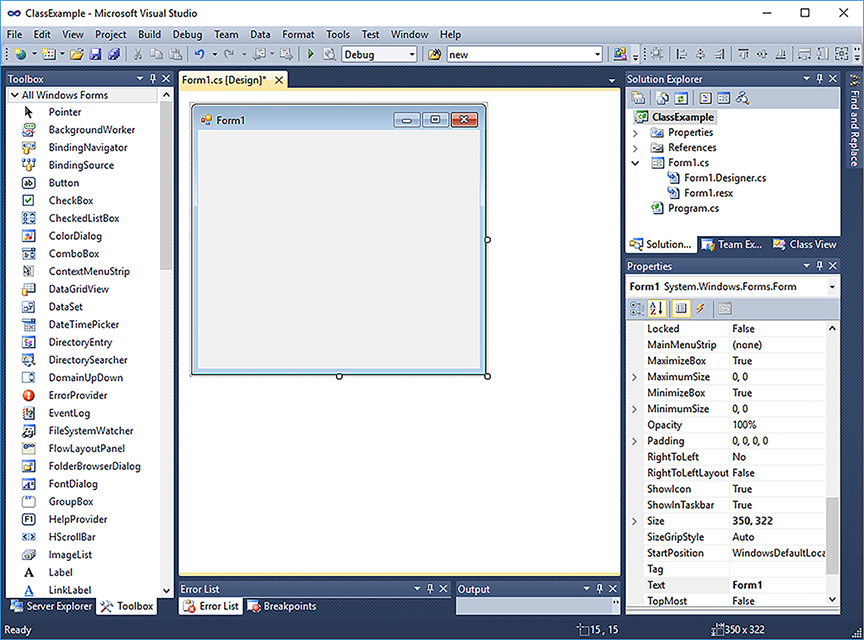
After clicking OK, you will get the screen shown on Figure #2 below:
Figure 2: Visual Studio New Project screen.
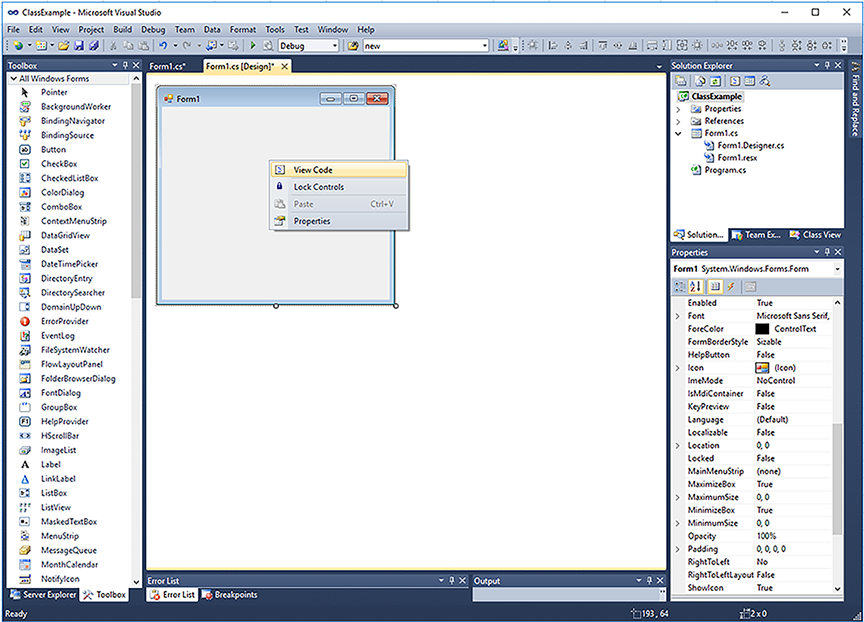
Right-click on top of Form1 and select View Code, as shown in Figure 3 below:
Figure 3: Right-click to show pop-up menu.
After selecting ViewCode, you will get a screen similar to Figure 4 below. You are now at the screen where you actually get to type the code.
Figure 4: Getting ready to type some code.
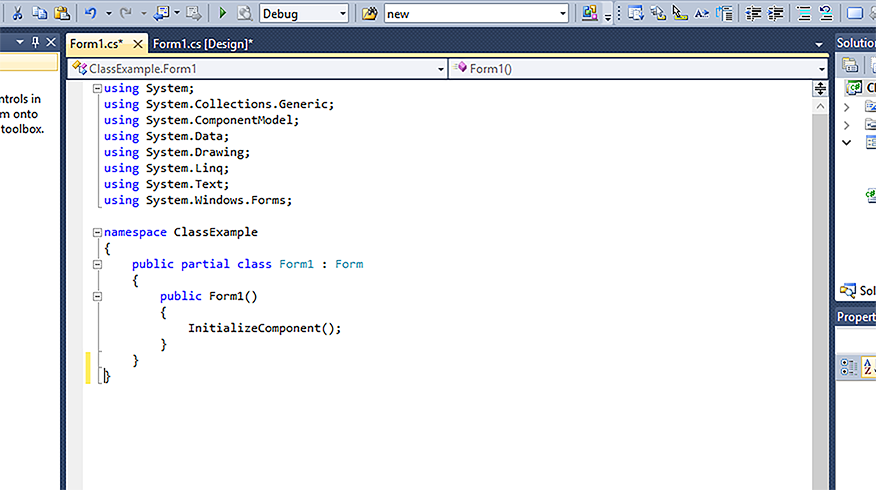
There are two characters that you may not be familiar with, the left and right curly brackets “{ }”. These two are essential characters in C# programming. Now, go all the way down to the bottom, between the last two curly brackets, make some space, and type the following code:
//******************************************************************************
//
//  Class Definition: Student Class
//
//******************************************************************************
public class Student
{
	//Private Properties
	private string pSSN;
	private string pLastName;
	private string pFirstName;
	private string pMI;
	private string pAddress1;
	private string pAddress2;
	private string pCity;
	private string pState;
	private string pZipCode;
	private DateTime pDoB;
	private int pAge;
	private string pGender;
	private double pGPA;
	private Boolean pCitizen;
	private string pCollege;
	/**/
	private Boolean pCitizenshipFormFulfilled;
	private Boolean pFinancialFormFulfilled;
	/**/
	//Public Accessors
	public string PSSN
	{
		get { return pSSN; }
		set { pSSN = value; }
	}
	public string PLastName
	{
		get { return pLastName; }
		set { pLastName = value; }
	}
	public string PFirstName
	{
		get { return pFirstName; }
		set { pFirstName = value; }
	}
	public string PMI
	{
		get { return pMI; }
		set { pMI = value; }
	}
	public string PAddress1
	{
		get { return pAddress1; }
		set { pAddress1 = value; }
	}
	public string PAddress2
	{
		get { return pAddress2; }
		set { pAddress2 = value; }
	}
	public string PCity
	{
		get { return pCity; }
		set { pCity = value; }
	}
	public string PState
	{
		get { return pState; }
		set { pState = value; }
	}
	public string PZipCode
	{
		get { return pZipCode; }
		set { pZipCode = value; }
	}
	public DateTime PDoB
	{
		get { return pDoB; }
		set { pDoB = value; }
	}
	public int PAge
	{
		get { return pAge; }
		set { pAge = value; }
	}
	public string PGender
	{
		get { return pGender; }
		set { pGender = value; }
	}
	public double PGPA
	{
		get { return pGPA; }
		set { pGPA = value; }
	}
	public Boolean PCitizen
	{
		get { return pCitizen; }
		set { pCitizen = value; }
	}
	public string PCollege
	{
		get { return pCollege; }
		set { pCollege = value; }
	}
	/* HIDDEN PROPERTIES */
	public Boolean PCitizenshipFormFulfilled
	{
		get { return pCitizenshipFormFulfilled; }
		set { pCitizenshipFormFulfilled = value; }
	}
	public Boolean PFinancialFormFulfilled
	{
		get { return pFinancialFormFulfilled; }
		set { pFinancialFormFulfilled = value; }
	}
	//
	//Class Constructor
	public Student()
	{
		// Initial values for these two variables
		pCitizenshipFormFulfilled = false;
		pFinancialFormFulfilled = false;
	}
}
In the code above I have defined all the properties related to my class as private as well as their public accessors. This is of particular importance because I am isolating data (private properties) through corresponding public accessors. Public accessors may contain code to validate conditions and enforce rules before ‘read from’ or ‘write to’ their private counterparts. The only way to get to the private properties is through their public accessors. The significance and relevance of the public accessors will become evident as I keep developing the class.
We are now ready to create an instance of our class, or an object based on the student class, so let’s do that by typing the following code:
private void Form1_Load(object sender, EventArgs e)
{
	/* Instantiation of class Student() */
	Student oStudent = new Student();

	/* Assigning values to properties */
}
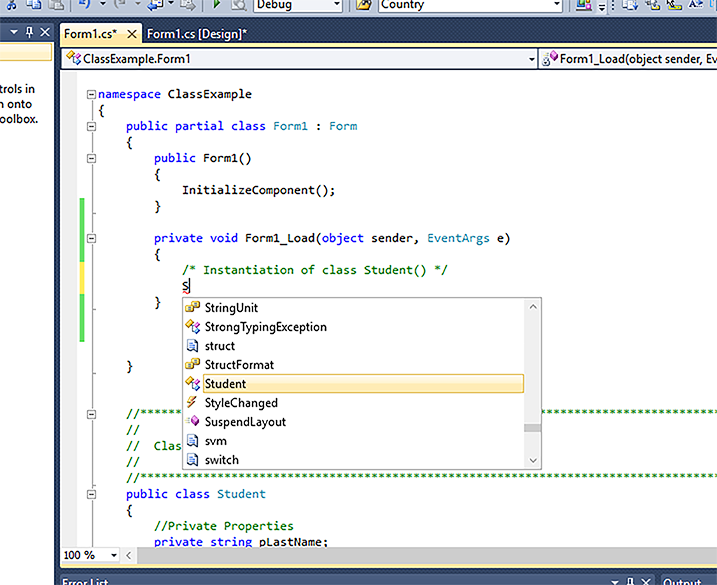
Observe how the word “Student” has a different color, and after I type the s (for student), C# pops up a menu called, IntelliSense, and displays the whole word “Student” among other words. This means that the C# compiler is now aware of the Student class. Our class became part of the C# data type system just as Integer and Double and String data types, Student is now part of the C# as a new data type. Observe IntelliSense in action in the screenshot below (Figure 5):
Figure 5: IntelliSense.
Now position the cursor right under the comment “Assigning values to properties” and type the following code to provide some data to the properties:
/* Assigning values to properties */
	oStudent.PSSN = "132-05-5489";
	oStudent.PFirstName = "John";
	oStudent.PLastName = "Lawrence";
	oStudent.PMI = "K";
	oStudent.PAddress1 = "123 Main St.";
	oStudent.PAddress2 = "";
	oStudent.PCity = "Austin";
	oStudent.PState = "TX";
	oStudent.PZipCode = "78701";
	oStudent.PDoB = DateTime.Parse("01/01/2001 12:00:00 AM");
	//
	// oStudent.PAge - Age will be a calculated field.
	//
	oStudent.PGender = "M";
	oStudent.PGPA = 4.2;
	oStudent.PCitizen = true;
	oStudent.PCollege = "College of Agriculture";
The code above should be replaced with a function call to connect to, and read a record from, a database, but I am not there yet, so I am manually assigning random data to the properties. I want to calculate the age after the DoB is typed, so I am adding a method to the base class that allows me to do that. Observe in the code below how the public accessor for property pDoB has changed to include a call to a function where the age is calculated.
public DateTime PDoB
{
	get { return pDoB; }

	set
	{
 		pDoB = value;
 		//
 		PAge = CalcAge(pDoB);
	}
}
Now go all the way to the bottom of the class definition code and add the function:
private int CalcAge(DateTime parDoB)
{
	//At this point parDoB has been validated as a valid date.

	int xAge = (DateTime.Today.Year - parDoB.Year);
	//
	// If below is true, then SHe has had a birthday already this year so increment age by one.
	if (parDoB.Month >= DateTime.Today.Month) { if (parDoB.Day <= DateTime.Today.Day) { xAge++; } }
	//
	return xAge;
}
Observe how the function was declared private so it can only be accessed from inside the class, and look how the return type expected is an integer, which will be the calculated age. This function subtracts the DoB year from the current year, then checks if birthday has occurred. If it did then it increments the age by one (1), thus, now we have a calculated field deep inside the class definition, therefore, whenever a student DoB is referenced, his or her age is re-calculated at the same time. This should give you an idea of how powerful classes are, and, at the same time, this example should awake your imagination as to how far a class can reach.
Let’s continue by adding a condition to change the GPA. So, GPA is read-only unless your system access level is under or equal to Level 2. Let’s assume Level 1 is Supervisor and Level 2 is Manager, and Level 3 and above are clerks and even students, so when users sign into the system, they pick up their level access. That level access will or will not allow them to change certain fields inside the system, and one of them is the GPA.
Go back all the way up to the opening curly bracket under the declaration of the form class and type the following code:
int gUserAccessLevel = 2;
Here, we are declaring a memory variable of type integer and assigning a value of 2. On a real application, this variable would have been read from an SQL table right after the user authenticated him-/herself, but this is an example, so I am simulating the assignment of the value to the variable.
Now, go back down to the accessor for property pGPA, and comment-out the following line of code:
//set { pGPA = value; }
By adding two forward slashes before the code, we are making it a comment, and by doing so, we have just made the pGPA property read-only because the part of the accessor that actually updates the property is now a comment. Commented-out code is not processed by the C# compiler. Add the following function at the bottom of the Student Class right under the CalcAge function:
public bool UpdateGPA(int parUserAccessLevel, double parGPA)
{
	if (parUserAccessLevel <= 2)
	{
		pGPA = parGPA;
		return true;
	}
	return false;
}
Finally, go back up to the Form1_Load method and comment-out the line of code assigning a value to GPA.
//oStudent.PGPA = 4.2;
Now, insert the following line of code:
oStudent.UpdateGPA(gUserAccessLevel, 4.2);
We are now using a function to update the GPA, but, as you can see, the function checks that the user asking to update the GPA has the proper access to do so.
At this point, we have added enough functionality and complexity to our class, so let’s move on to design a form to have users interact with the data class.
Click here to go to the second phase for this project, creating a form to host the class.
Click here for the project's third phase, interface with an SQL/Access Database.
You can also click the circled numbers below.
As you can see C# programming its pretty simple and fun to build programs with. Please don’t forget to leave your comments below, and thanks for visiting.
Projects
Scrolling Characters Emulation
C# Base Form. Creating A Derived Form
When it comes to variable types, C# has two kinds of 'types', 'value type' and 'reference type'. Variables of value types store their values directly on them whereas variables of reference types store a reference to where the data is actually being kept or stored.